Sep 30, 2007

Chestnut cake

I am sooo happy with this cake!!! I know the picture does not look very good, but you have to make this cake. That is if you like chestnuts. This is a very common cake in Hong Kong. The sponge cake is amazingly light and the chestnut has just the right amount of sweetness, I think the flavor developed after refrigeration because it tasted better the next day. I have been searching for a recipe for this cake because my mom made a special request for this cake. I found a recipe at Eupho cafe and I also found a recipe in an old chinese cookbook I have, called Chopsticks Recipes Cakes and Bread. I adapted things from both recipes and came up with this!!

Chestnut cake

adapted from Chopsticks recipes cakes and bread and Eupho cafe


Chiffon cake:

Four eggs

80g Caster sugar

60ml Vegetable oil

1 tsp vanilla

3 tbsp milk

86g cake flour

2 tbsp cornstarch

1 tsp cream of tartar


  1. Sift together cake flour and cornstarch.
  2. Separate egg yolks and egg whites. Using a stand mixer or electric beaters, Beat the egg yolks. While beating the egg yolks, add 40g of the caster sugar. Add sugar in 1 tbsp increments. Beat the egg yolks until it's light and fluffy and the color is a very pale yellow. Once the egg yolks reach that state, mix in the oil, milk and the vanilla. Sift in the cake flour and cornstarch mixture. Gently fold in the flour mixture until just incorporated.
  3. Preheat oven to 350 F. Add cream of tartar to egg whites and beat with a electric mixer or a stand mixer. Once the egg whites are foamy, add the remaining sugar into the egg whites in 1 tbsp increments. Beat until the egg whites reach soft peaks.
  4. Gently fold 1/3 of the egg whites until just incorporated. Repeat with the remaining egg whites. Pour the cake mixture into a 8" cake pan (do not grease the pan). Hit pan gently against the counter to remove big bubbles. Bake for 25 to 35 minutes.
  5. When the cake is finished baking, cool cake upside in the pan. Once the cake is completely cooled, take the cake out of the pan and cut into two equal pieces.

Whipped cream:

2 cups heavy cream

2 tbsp sugar

2 tsp vanilla


  1. Beat the cream and sugar in a chilled bowl of an electric mixer at medium speed to soft peaks. Then add the vanilla and continue to beat to barely stiff peaks.


Chestnut filling:

Cooked chestnut 250g

1 1/2 tbsp butter

4 1/2 tbsp caster sugar


  1. Process cooked chestnut into a food processor until it's fine. Meanwhile, melt butter and sugar together. Poor the butter mixture in the chestnut filling and mix to combine. Once the mixture has cooled, fold in 1/2 cup of the whipped cream.
  2. To assemble to cake: lay one layer on a cake stand. spread the chestnut filling evenly on the cake. Top with the second layer of the cake and press gently. cover entire cake with the remaining whipped cream and spread the whipped cream evenly to cover the entire cake.


Sep 28, 2007

Oreo-like cookies


I've been eyeing this recipe for a long time. I first saw it in a cookbook called retro desserts...then i noticed that some bloggers were raving about it. So i thought i would try it. I *LOVE* regular oreo cookies, and these are not like oreo cookies. the texture is not the same. it's not as crunchy as the original cookies. i think it would be better to use chocolate ice box cookies to make oreo cookies to accomplish the same crunch. nonetheless, these are good cookies...very very sweet!! they're a lot of fun to make. cookies taste much better with some milk.

Chocolate sandwich cookies with vanilla cream filling
Retro Desserts

For chocolate wafers:

1 1/4 cups all-purpose flour
1/2 cup unsweetened Dutch process cocoa
1 teaspoon baking soda
1/4 teaspoon baking powder
1/4 teaspoon salt
1 1/2 cups sugar
1/2 cup plus 2 tablespoons (1 1/4 sticks) room- temperature, unsalted butter
1 large egg

  1. Set two racks in the middle of the oven. Preheat to 375 degrees.
  2. In a food processor, or bowl of an electric mixer, thoroughly mix the flour, cocoa, baking soda and powder, salt, and sugar. While pulsing, or on low speed, add the butter, and then the egg. Continue processing or mixing until dough comes together in a mass.
  3. Take rounded teaspoons of batter [For oversized ones, I used a 1/8 cup scoop] and place on a parchment paper-lined baking sheet approximately 2 inches apart. With moistened hands, slightly flatten the dough. Bake for 9 minutes, rotating once for even baking. Set baking sheets on a rack to cool.

For vanilla-cream filling:

¼ cup (1/2 stick) unsalted butter at room temperature

¼ cup vegetable shortening

2 cups confectioners’ sugar

2 tsp vanilla extract

  1. Put the butter and shortening in a mixing bowl and at low speed, gradually beat in the confectioners’ sugar and vanilla, until blended. Turn the mixer up to high and beat for 2 or 3 minutes more, until fluffy.
  2. To assemble cookies: with a pastry bag fitted with a ½ inch tip, pipe teaspoon size blobs of filling onto the tops of half the cookies. Keeping the smooth bottoms of the cookies facing up, flip the remaining cookies on top of the filling and lightly press to form sandwiches.

Sep 13, 2007

Jalapeno cheese twist & pizza rolls


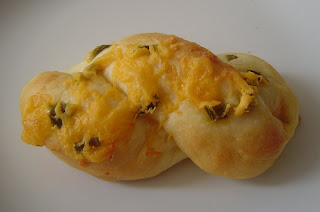
I was reading about this Japanese method for making bread, it's called water roux bun method. I read about it at Cafe of the East. I was so excited while kneading the dough, I could taste the soft texture of the bread with every push of my palm. =P This dough made approximately 16 rolls. I used some of the rolls to make a pizza roll and the rest as a Jalapeno twist.


I still have a lot to learn in shaping the dough..it's not as pretty as I would like. But it's very tasty!! The bread has a really soft texture. For the Jalapeno twist, I put little chopped up bits of jalapeno peppers and shredded cheddar cheese. For the pizza roll, I used pepperoni and shredded mozzarella cheese. Both came out really well. Here's the recipe:


Water-Roux bun Dough
from Cafe of the East

325g bread flour
130g plain flour + 20g vanilla custard powder, or cornflour (or just use 150g plain flour)
20g milk powder
50g caster sugar
1 teaspoon salt
1 sachet (7g or 2 1/2 tsp) instant dry yeast
2 eggs, lightly beaten
100ml (approx.) lukewarm water, adjust as necessary (I only needed 75ml for this batch)
75g butter, cubed

Water Roux:
25g (just under 2 tbsp) bread flour
125ml (1/2 cup) water


To make the water roux:
1. Mix flour and water in a small saucepan. Cook over low to medium heat, stirring continuously until it reaches 65ºC (149ºF). It should have thickened to a paste at this stage, that is when you stir you can see the bottom of the pan. Remove from heat, place a cling wrap over the paste and leave until lukewarm, or room temperature, before using. (Alternatively if you don’t have a thermometer, cook as before until it just starts to thicken, then continue to cook for about 1 more minute before removing from heat.) This water roux can be kept in an airtight container after cooling in the refrigerator for 1 day if not used immediately. However DO NOT USE if it turns grey in colour, that means it has gone bad.

To make the bun Dough:
1. Sift bread flour, plain flour, custard powder, milk powder, caster sugar and salt onto the working surface. Add instant dry yeast and mix well. Form the flour mixture into a well. Add lightly beaten eggs and lukewarm water roux and mix in. Gradually add just enough lukewarm water to form into a slightly sticky, soft dough. Knead for 10 minutes until smooth and elastic. During hand kneading, the dough also needs to be thrown onto the working surface once every few minutes between kneading to improve the dough structure. (I usually just pick up the dough to about head-high and throw it down onto the working surface 10 to 20 times every few minutes between kneading.)

2. Knead in butter until incorporated. Form the dough into a round ball and let it rise until double in size in a large greased bowl, cover with cling wrap (should take about 1 hour in warm weather, longer in winter months). To test if the dough has risen properly, dip a finger into bread or plain flour and poke down into the centre of the dough as far as your finger will go and pull out again – the hole should remain if it is ready. If the dough springs back, then it is not ready, continue to prove further.

3. Punch down, knead briefly. Then divide into 16 equal portions. The easiest way is to first divide equally into 4 larger portions first, then divide each of these again into quarters each. Form each into balls and let rest for 10 minutes.

4. Shape and fill as desired to make into buns of your choice. Place all finished buns on a greased baking sheet, lightly cover with cling wrap, and let rise until double in size (about 1 hour in warm weather, longer in winter months).

5. Bake in preheated 190°C (374ºF) oven for about 12-15 minutes.

Note:
  • I didn't have custard powder, so I ended up using 150g of all purpose flour.

Mango pudding


My coworker gave me some mangoes, so I thought I would make some refreshing mango pudding. There's a local dim sum restaurant called Panda Cuisine that has the best mango pudding. I tried looking online for a similar recipe, and found one at Saffron Trail. The mango pudding came out really well, it's really refreshing for a hot summer day. Here's the recipe:

Mango pudding
adapted from Saffron Trail

ingredients:
2 cups mango puree (Peel the mangoes, cube and puree )
1 cup evaporated milk
1 envelope of gelatin
200 ml water

1. Add the mango puree and milk into a bowl. Mix well.

2. Dissolve the gelatin in 200 ml hot water thoroughly.

3. Add the gelatin mixture to the mango mixture and stir.

4. Divide the mixture between 5 ramekins and refrigerate for an hour. The pudding should look set and jiggle when shaken.

5. To unmould- dip the bases of ramekins in warm water, run a knife blade to free the pudding from the sides, shake gently and upturn onto a plate.

Note:

  • The original recipe called for 1/3 cup of sugar, I didn't add it because after tasting the mixture, I thought it was sweet enough.
  • I think next time I will use less water, I felt it diluted the mango puree too much.

Sep 10, 2007

Sweet potato haupia squares


I've had this recipe for a sweet potato haupia squares for a long time, but didn't get a chance to make it till today. This recipe uses Okinawan sweet potato, which has a tan color skin and a beautiful purple color on the inside. The Okinawan sweet potato is not as sweet as the regular orange ones, but has a great taste. Haupia is a Hawaiian dessert made with coconut milk. The traditional haupia is like a coconut pudding but has a firmer texture than pudding.

The haupia part of this pie is actually very creamy, more like a coconut whipped cream. This recipe is relatively simple, although it does take a lot of time to make because you have to wait for the layers to set. I didn't make the coconut crust that the recipe calls for, as I didn't have coconut flakes. I made a walnut crust instead. A more appropriate crust for this pie would probably be a macadamia nut shortbread type crust.

This is the original recipe, which I got from my friend, not sure where she got it from.

Sweet potato haupia squares

Coconut Crust:
2 cups sifted flour
½ cup sugar
1 tsp. Chinese 5 spice
¼ tsp. ground ginger
½ cup unsalted butter
½ tsp. salt
½ cup toasted coconut flakes,
plus another ¼ cup to sprinkle on top of finished pie.

Note: to toast the coconut flakes, spread them on a sheet pan and put them in a 325° oven. Bake for about 8-10 minutes, stirring occasionally, until light brown.

Preheat oven to 350°. Using a food processor with a blade attachment, combine all the ingredients (except the extra ¼ cup of toasted coconut flakes - put those aside for later) until just blended and dough forms a rough ball. A fork or pastry blender may be used instead of a food processor. Press pie dough into a 9” X 13” pan. Bake for 15-20 minutes until set.

Sweet Potato Filling:
½ cup butter, softened
1 cup sugar
2 eggs, beaten
½ cup evaporated milk
1 tsp. vanilla extract
½ tsp. salt
½ tsp. cinnamon
2 cups purple sweet potato, cooked and mashed

(Note: to prep the sweet potatoes, I boiled them until tender and then peel the skin off after they’ve cooled a bit. While they’re still warm, I beat them with a hand mixer until fluffy. You can play around with the texture of the potatoes to see what you like. I just like the lighter texture that you get when you beat them with a hand mixer.)

Cream butter and sugar until light. Add eggs and evaporated milk; mix well. Add the beaten sweet potato, vanilla, salt and cinnamon; mix well. Pour into baked crust and bake for 40 minutes. Cool completely before adding haupia topping.

Haupia:
½ cup sugar
6 Tbsp. cornstarch
¾ cup water
1-13.5 oz. can coconut milk
1 cup whipping cream

Combine sugar, cornstarch and water. In a saucepan, bring coconut milk to a slow simmer. Stir in cornstarch/sugar mixture. Simmer over low heat, stirring constantly until the mixture thickens. Remove from heat and cool. Beat the haupia with an electric mixer until smooth. Whip the cream separately until stiff (you can use the mixer again – no need to clean off the beaters) and fold into whipped haupia. Frost the top of the cooled pie with the haupia. Sprinkle the reserved ¼ cup toasted coconut flakes on top.

Note:

  • I used a 9x9 square pan instead of a 9x13 pan.

Sep 3, 2007

Pesto


I had a lot of left over basil from the ricotta gnocchi, so I thought I would make some pesto. Found a recipe for pesto in my trusty New Best recipe cookbook. Pesto is so easy to make and it's so tasty!!! I can just have pesto on bread as my meal...mmmm. Anyway, here's the recipe, enjoy!

Classic pesto
The New Best Recipe

Ingredients:
¼ cup pine nuts, walnuts or almonds
3 medium garlic cloves, unpeeled
2 cups packed fresh basil leaves
2 tbsp packed fresh parsley leaves (optional)
7 tbsp extra virgin olive oil
Salt
¼ cup finely grated Parmesan cheese

1. Toast the nuts into a small, heavy skillet, over medium heat, stirring frequently, until just golden and fragrant, 4 to 5 minutes. Transfer the nuts to a plate.

2. Add the garlic to the empty pan. Toast, shaking pan occasionally, until the cloves are fragrant and their color deepen slightly, about 7 minutes. Transfer the garlic to a cutting board: cool, peel and chop.

3. Place the basil and parsley (if using) in a heavy-duty gallon sized zipper lock plastic bag. Pound the bag with the flat side of a meat pounder or a rolling pin until all the leaves are bruised.

4. Place the nuts, garlic, herbs, oil, and ½ tsp salt in a food processor and process until smooth, stopping as necessary to scrape down the sides of the bowl. Transfer the mixture to a small bowl, stir the Parmesan cheese, and adjust the salt to taste. (The surface of the pesto can be covered with a sheet of plastic wrap or a thin film of oil and the pesto can be refrigerated for up to 3 days.

Note:
  • I omitted the parsley as I didn't have it on hand.
  • I don't like my pesto so oily, so I only used about 3 tbsp of olive oil.
  • I made about 3/4 lb of spaghetti and tossed the pesto with the spaghetti and some of the pasta water.

Sep 2, 2007

Ricotta Gnocchi


Had some friends over for lunch today and I made Ricotta Gnocchi with a Tomato Cream Sauce. The recipe is from the September/October 2007 edition of the Cook's Illustrated magazine. I personally love gnocchi, but I was hesitant to make this as so much can go wrong with gnocchi. I've had really bad gnocchi and really good gnocchi. This one I have to say doesn't taste like regular gnocchi at all. It tastes more like a cheese ravioli without the pasta skin. It doesn't have the same texture as potato gnocchi, but good just the same. Here's the recipe:

Ricotta Gnocchi
September October 2007 of Cook's Illustrated

Ingredients:
1 (15 or 16 oz) container whole milk ricotta cheese
2 large slices white sandwich bread, crusts removed and bread torn into quarters
1 large egg
2 tbsp minced fresh basil leaves
2 tbsp minced fresh parsley leaves
table salt
6 tbsp all purpose flour, plus additional for work surface
1 oz Parmesan cheese, grated (about 1/2 cup)

1. Line fresh mesh strainer set over deep container or bowl with 3 paper coffee filters or triple layer of paper towels. Place ricotta in lined strainer, cover, and refrigerate for 1 hour. Adjust oven rack to middle position and heat oven to 300 degrees.

2. Meanwhile, process bread in food processor until finely ground, about 10 seconds. Spread crumbs on rimmed baking sheet and bake until dry and just beginning to turn golden, about 10 minutes, stirring once during baking time. Let cool to room temperature. (You should have about 1/2 cup of crumbs)

3. Transfer drained ricotta to food processor and pulse until curds break down into fine, grainy consistency, about eight 1-second pulses. Using rubber spatula, combine ricotta, egg, basil, parsley, 1/2 tsp salt, and pepper in a large bowl. Add flour, Parmesan, and bread crumbs, stir until well combined. Refrigerate dough for 15 minutes. Check texture of dough and add more flour if needed.

4. Lightly dust work surface with flour. With floured hands, roll lemon sized piece of dough into 3/4 inch thick rope, rolling from center of dough outward. Cut rope into 3/4 inch long pieces and transfer to parchment paper lined rimmed baking sheet. Repeat with remaining dough, dusting work surface with flour as needed.


my gnocchi army!

6. Bring 4 quarts water to boil in large pot or Dutch oven over high heat. Add 1 tablespoon of salt. Reduce heat so water is simmering, then gently drop half of gnocchi into water and cook until all pieces float to surface. Continue to simmer until gnocchi are cooked through, about 2 minutes longer, adjusting heat to maintain a gentle simmer. Using slotted spoon, scoop gnocchi from water, allowing excess water to drain from spoon; transfer gnocchi to skillet with sauce and cover to keep warm. Repeat cooking process with remaining gnocchi. Using rubber spatula, gently toss gnocchi with sauce until uniformly coated. Divide among warmed bowls or serving platter and serve immediately.

Note:
  • I used part skim ricotta in my gnocchi.
  • I didn't have parsley on hand, so I omitted it.
  • I ended up using about 8 tbsp of all purpose flour in my dough because it was still very sticky after refrigeration.
  • When rolling out the dough, you will need a lot of flour, dusting the work surface all the time. The dough is incredibly sticky.
  • When cooking the gnocchi, keep a close eye on the water. Make sure the water is not at a full boil or your gnocchi will fall apart.

Hokkaido Milk Bread

Yipee!! I finally did it. I have been looking at this recipe from Angie's blog for so long, trying to decide if I can make this. This was actually not as hard as I thought it would be, and the outcome is wonderful!!! The bread is still soft three days after I made it, which is very surprising. I love the taste of this bread, so much better than just plain white bread and it's delicious toasted. This makes a great sandwich bread, but it's good enough to eat by itself. Here's the recipe.

Hokkaido milk bread
Angie’s Recipes


Ingredients

540g Bread flour
60g Cake flour
10g active yeast
30 g milk powder
80g sugar
9 g salt
1 egg
250 g Fresh milk
150 g heavy whipping cream

  1. Mix all the ingredients in the bowl of an electric stand-mixer. Remember separate the yeast from salt and sugar to avoid the dehydration.
  2. Knead until gluten is fully developed and the dough is elastic, smooth, non-sticky and leave from sides of mixing bowl. Cover with a damp towel and allow the dough to ferment until double in size, about 60 minutes.
  3. Take out the dough and press out the gas produced during the proof. Divide it into 4 portions. Round up and let rest for about 20 minutes.
  4. Roll each dough out and roll up and place in a 13x33x12cm loaf pan. After shaping, let the dough rise up to 2/3 full. Brush with egg wash or milk. Bake in a preheated 170C/340F oven for about 40 minutes.

Note:

  • I never understood what they mean by separating the yeast from the salt and sugar when everything needs to be combined together. So what I did was put in the yeast first and the salt and sugar last..hopefully that's what she meant.
  • My dough took a little longer to rise during the first proof, I waited for about an hour and a half.
  • I didn't have a loaf pan like the one recommended in the recipe, so I used two regular size loaf pans and made two loafs. I wonder if it's necessary for the dough to be rolled into four different loaves...hm...
  • I only baked the bread for 30 minutes.
 

Template by Best Web Hosting