Sep 16, 2010

Hamburger kebab pita sandwiches


I confess that I'm not a big fan of beef. Don't give me a good piece of steak, because it will be completely wasted on me. I'm the kind of girl that will go to Ruth Chris and order chicken (gasp!!)...I just don't like the taste of beef.

The only way I will eat beef is when it doesn't taste like beef. That is why this hamburger kebab is right down my alley! I've made a similar recipe before from Cook's Illustrated, but that was way too beefy. This one has more spices, making it incredibly delicious!! Here's the recipe.

Hamburger kebab pita sandwiches
adapted from Quick and Easy Indian cooking

1 1/2 lb finely ground beef or lamb
6 to 7 tbsp coarsely chopped fresh cilantro
2 fresh, hot green chilies, cut into fine rounds and chopped
1/4 of a onion, finely chopped (see note)
1 1/2 tsp cumin seeds
1 1/2 tsp coriander seeds
1 tsp freshly ground black pepper
1 1/4 tsp salt
1 lightly beaten egg (see note)
3 to 4 tbsp vegetable oil


1. Put the ground beef into a medium sized bowl. Add all other ingredients except the oil and mix well. Form ten 2 inch balls. Flatten the balls to make ten 3 1/2 inch hamburgerlike patties.

2. Just before eating, put 2 tbsp of the oil into a large nonstick frying pan and set over medium high heat. When the oil is hot, put as many kebabs as the pan will hold in a single layer. Turning them over every 20 seconds or so, cook the kebabs for about 2 1/2 minutes or until they have browned on both sides. Remove to a warm plate. Using the remaining oil to cook a second batch the same way.

3. Serve on pita bread with tomatoes and yogurt sauce (recipe to follow).


Yogurt sauce

1 cup plain yogurt
2 cloves of garlic, minced
small bunch of cilantro, chopped fine
small bunch of mint leaves, chopped fine
salt


1. Combine all ingredients.


Notes:
  • *The original recipe calls for 1 tbsp of chickpea flour. You are to heat the chickpea flour in a small cast iron frying pan and stir around over medium heat until the flour has turned a light brown color. I didn't know where to find chickpea flour, so I omitted it.
  • *The original recipe did not include onions, I just added it because I needed to get rid of some left over onions. It was a nice addition.
  • *The original recipe calls for 1/2 of an egg. I used a whole egg because my meat needed more "glue".
Sep 9, 2010

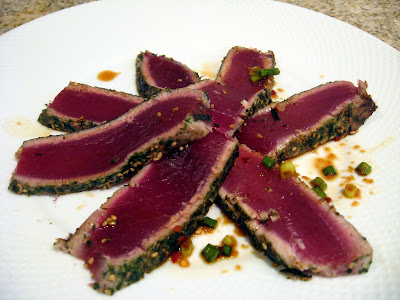
Seared Furikake Ahi


Mr. G just started his new job last week and to celebrate his first day, I made Furikake seared ahi (tuna) for dinner! Since moving out, I've been terrified of cooking fish...don't ask me why. We both love seafood, but for some reason, I've been too scared to venture in that arena. Thankfully, this is really simple, even I couldn't mess this up!!

I bought two beautiful pieces of fresh ahi from Costco!! Who would've thought Costco would have such fresh fish? I adapted a recipe from Cook's illustrated for pan seared sesame crusted tuna steaks, but really, it's so easy you don't even need a recipe.

The ahi was sooo yummy!! I served it with a simple wasabi soy sauce and it was perfect just as it is. I thought about making a wasabi aioli, but after the fish was cooked, I was too anxious and just wanted to tackle it. =) Here's the recipe.


Seared Furikake Ahi
adapted from Cooks Illustrated February 2003

3/4 cup furikake
4 tuna steaks, 8 oz each and about 1 inch thick
2 tbsp vegetable oil


1. Spread furikake in a shallow baking dish or pie plate. Pat tuna steaks dry with paper towel; use 1 tbsp of oil to rub both sides of steaks. Press both sides of each steak in furikake to coat.

2. Heat remaining 1 tbsp oil in a 12 inch nonstick skillet over high heat until just beginning to smoke; swirl to coat pan. Add tuna steaks and cook 30 seconds without moving steaks. Reduce heat to medium high; continue to cook for about 1 1/2 minutes.

3. Using tongs, carefully flip tuna steaks; cook, without moving steaks for another 1 1/2 minutes for rare, or 3 minutes for medium rare. To serve, cut into 1/4 inch thick slices.

Note:
  • *the original recipe calls for 3/4 cup of sesame seeds, they also season the steaks with salt and pepper before adding the sesame seeds. Because the furikake is already seasoned, I omitted the salt and pepper.

Sep 6, 2010

Miss Baked Alaska-Daring Bakers


The August 2010 Daring Bakers’ challenge was hosted by Elissa of 17 and Baking. For the first time, The Daring Bakers partnered with Sugar High Fridays for a co-event and Elissa was the gracious hostess of both. Using the theme of beurre noisette, or browned butter, Elissa chose to challenge Daring Bakers to make a pound cake to be used in either a Baked Alaska or in Ice Cream Petit Fours. The sources for Elissa’s challenge were Gourmet magazine and David Lebovitz’s “The Perfect Scoop”.

I am so late...again!! I was really excited to make August's daring baker challenge, I love browned butter and I want to use it all the time!! I decided to make the baked alaska for my friend for her birthday. She absolutely loves ice cream, and what's a better birthday cake for her than a Baked Alaska. But August was so crazy...I felt like I didn't have time to breath. Since I had a long weekend, I decided I better make this now!

To make it extra special, I decided to make a barbie cake!! I don't know what possessed me to do this..but I thought it would be fun. I bought a Disney High School Musical doll named Gabriella. I don't even know what High School Musical is. (Am I getting old?)

Anyway...I used the browned butter cake as the base, and put chocolate ice cream on top. I used a Chocolate ice cream recipe from David Leibovitz via Amanda's cooking. This chocolate ice cream is sooo good!!! The browned butter cake is even better!! I will be making both of these again and again. The cake came to getting pretty quickly after all the components were made. The hardest part was keeping the contents of my freezer away from Miss Alaska. =) Here are the recipes.


Baked Alaska

Brown Butter Pound Cake
adapted from Gourmet October 2009

19 tablespoons (9.5 oz) (275g) unsalted (sweet) butter
2 cups (200g) sifted cake flour (not self-rising; sift before measuring)
1 teaspoon (5g) baking powder
1/2 teaspoon (3g) salt
1/2 cup (110g) packed light brown sugar
1/3 (75g) cup granulated sugar
4 large eggs
1/2 teaspoon pure vanilla extract


1. Butter and flour a 9”x9” (23cmx23cm) square pan. Place the butter in a 10” (25cm) skillet over medium heat. Brown the butter until the milk solids are a dark chocolate brown and the butter smells nutty. (Don’t take your eyes off the butter in case it burns.) Pour into a shallow bowl and chill in the freezer until just congealed, 15-30 minutes.

2. Preheat the oven to 325°F/160°C and put a rack in the center. Whisk together cake flour, baking powder, and salt.

3. Beat the brown butter, light brown sugar, and granulated sugar in an electric mixer until light and fluffy, about 2 minutes. Beat in the eggs one at a time, mixing well, and then the vanilla extract. Stir in the flour mixture at low speed until just combined. Scrape the batter into the greased and floured 9”x9” (23cmx23cm) square pan. Smooth the top with a rubber spatula and rap the pan on the counter. Bake until golden brown on top and when a toothpick inserted into the center comes out clean, about 25 minutes.

4. Cool in the pan 10 minutes. Run a knife along the edge and invert right-side-up onto a cooling rack to cool completely.


Chocolate ice cream
from David Leibovitz's Perfect Scoop via Amanda's cooking

2 cups heavy cream
3 tablespoons unsweetened Dutch-process cocoa powder
5 ounces bittersweet or semisweet chocolate, chopped
1 cup whole milk
3/4 cup granulated sugar
Pinch of salt
5 large egg yolks
1/2 teaspoon vanilla extract


1. Warm 1 cup of the cream with the cocoa powder in a medium saucepan, whisking to thoroughly blend the cocoa. Bring to a boil, then reduce the heat and simmer at a very low boil for 30 seconds, whisking constantly. Remove from the heat and add the chopped chocolate, stirring until smooth. Then stir in the remaining 1 cup cream. Pour the mixture into a large bowl, scraping the saucepan as thoroughly as possible, and set a mesh strainer on top of the bowl.

2. Warm the milk, sugar, and salt in the same saucepan. In a separate medium bowl, whisk together the egg yolk. Slowly pour the warm milk into the egg yolks, whisking constantly, then scrape the warmed egg yolks back into the saucepan.

3. Stir the mixture constantly over the medium heat with a heatproof spatula, scraping the bottom as you stir, until the mixture thickens and coats the spatula (170°F on an instant-read thermometer). Pour the custard through the strainer and stir it into the chocolate mixture until smooth, then stir in the vanilla. Stir until cool over an ice bath.

4. Chill the mixture thoroughly in the refrigerator, then freeze it in your ice cream maker according to the manufacturer’s instructions. (If the cold mixture is too thick to pour into your machine, whisk it vigorously to thin it out.)


Meringue

4 large egg whites
1/4 teaspoon cream of tartar
1/4 teaspoon salt
1/2 cup sugar


1. Beat the egg whites, cream of tartar, and salt on high speed in an electric mixer until soft peaks form. Beat in the sugar gradually in a slow stream until stiff peaks form.


Miss Baked Alaska assembly


1. Spread ice cream in a shallow baking pan and freeze.

2. Cut out one 5” diameter circle from the cake. Cut a small circle in the middle for the doll to stand in. Discard the scraps or use for another purpose.

3. Make the meringue (see above.)

4. Cut out a few 5" ice cream circles with a small circle in the middle and place them on top of the cake. Smooth out the body to create the skirt for the princess.

5. Pipe the meringue over the ice cream and cake, or smooth it over with a spatula, so that none of the ice cream or cake is exposed. Freeze for one hour or up to a day.

6. Burn the tips of the meringue with a cooking blow torch. Or, bake the meringue-topped Baked Alaskas on a rimmed baking sheet in a 500°F/260°C oven for 5 minutes until lightly golden. Serve immediately.

Sep 3, 2010

Baked Manapua (Baked Char siu bao)


My good friend gave birth to a beautiful baby girl a couple of days ago. Congrats, Mr & Mrs. O!!! Instead of bringing her flowers and balloons, I decided to make her some baked manapuas (it's her favorite dim sum treat). I remember after my sister gave birth, all she wanted was food, and she wanted it all the time. So I thought this was fitting.

This recipe came from a dim sum class that I took a couple of years ago from the Adult Education class at Kaimuki High School. Sad to say though, that the manapua recipe was the only thing I liked from the class.

This is a really good recipe for the dough and also for the char siu (roast pork) filling. The bread is nice and soft and the filling is very flavorful. I made this a few times already and everyone seems to like it a lot.


Baked Manapua
from Dim Sum class at Kaimuki High School

1/2 tsp salt
1/3 cup sugar
1/4 cup shortening
1/4 cup warm water
1 1/2 tsp active dry yeast
1 cup milk
1/3 cup warm water


1. Mix 2 cups of flour, salt and sugar into a large bowl. With a pastry blender or two knives, cut in the shortening until the flour resembles coarse meal.

2. In a small bowl, mix 1/4 cup warm water with the yeast and let it soften for 5 minutes.

3. Put the milk and the 1/3 cup of warm water together, then stir in the yeast mixture. Then add the yeast mixture to the flour mixture and mix well.

4. Add the remaining 1 1/4 to 1 1/2 cup of flour until dough forms into a sticky mass. Turn the dough out onto a well floured board. Knead 5 to 8 minutes, or until the dough is smooth and elastic. Adding flour as needed to prevent sticking.

5. Grease a large bowl. Place the dough in the bowl and turn it to coat all sides. Cover the bowl with plastic wrap, and let the dough rise in a warm draft free place for about 1 hour, or until doubled in bulk.

6. Divide the dough into 16 portions. Flatten dough into a circle with fingers. Place a heaping spoon of filling onto the center. Gather the edges of the dough together and pinch firmly to seal in the filling. Put the bun, pinched side down on a piece of parchment paper and onto a baking sheet. Repeat with the remaining dough and filing. Let the buns rise for 30 minutes. Brush buns with egg wash and bake at 350 degrees for 20 to 25 minutes.


Char Siu Filling for manapua

1 cup water
1 tbsp of sugar
1 tbsp soy sauce
1 tbsp oyster sauce
2 tbsp corn starch
1 tsp garlic salt
1 lb char siu, chopped into small pieces
1/4 of a large onion, diced
2 stalks of green onion, chopped
pepper to taste


1. Mix water, sugar, soy sauce, oyster sauce, cornstarch, and garlic salt together in a bowl, set aside. In a pan, saute char siu and onion together for about 5 minutes. Re-stir the sauce mixture and add it to the char siu and onion. Continue stirring and cooking until sauce thickens. Turn off heat and add the green onion and pepper to taste.
 

Template by Best Web Hosting