Jun 23, 2013

Hong Kong Bun


I think this bun is called Hong Kong Bun in the states. In Hong Kong, it's called Cocktail Bun (literal translation). Until now, I had no idea why it had this name. I even asked my dad, and he had no idea either. I did a quick search on google, and came up with this from Wikipedia.

The cocktail bun is said to have been created in the 1950s in Hong Kong, when the proprietors of a bakery resisted the wasteful disposal of unsold but perfectly edible buns. The solution was to incorporate these buns into a new product to be sold fresh. The day-old buns were ground up, with sugar and coconut added in, to create a tasty filling mixture; fresh bread dough was wrapped around this mixture to make the first filled "cocktail bun".
Its name is said to have come from comparing the baker's mixture of hodgepodge of ingredients to a bartender's exotic mixture of alcoholic liquors, both formulating a "cocktail". The Chinese name is a literal translation of "cocktail", and is called a "chicken-tail bun".

How cool is that? I loved eating this bun when I was growing up in Hong Kong. When we moved to Hawaii, we found this place called Red Ruby that made wonderful Cocktail Buns. The filling was so buttery and coconut-y, it was such an indulgent bun! The bad part is the saleswoman (owner?) was so grumpy (I hope she's happier now in retirement!). She had a horrible attitude and would get so mad when you only wanted to buy one. Now the bakery is closed and I can't find a comparable version anywhere. Doesn't this seem like the theme of my blog? So here I am attempting to create my own at home. The results?! Not nearly as good as Red Ruby's, but not too bad for a first try. The bun is incredibly soft, but the filling is not nearly as indulgent. I probably need to add another pound of butter to create that filling. For now, it's a good substitute. Hope you enjoy it!!

Hong Kong Bun
adapted from Aunty Yochana

Bread:
500 g Bread Flour
8 g custard powder
20 g milk powder
1/2 tsp salt
100 g Sugar
10 g Instant Yeast
230 g water
75 g unsalted butter, softened
1 egg, beatened
toasted sesame seed

Filling:
250 g unsalted butter, melted and cooled
250 g dessicated coconut, unsweetened
120 g plain flour
100 g milk powder
1/2 tsp Vanilla extract

Topping:
50 gm. unsalted butter, softened
20 gm. sugar
45 gm. plain flour

1. Combine the bread flour, custard powder, milk powder, salt, sugar and instant yeast in a large bowl. Gradually add the water until a rough dough is formed. Knead the dough briefly in the bowl. Transfer to a floured surface and continue to knead until a smooth dough is formed. Gradually knead in the butter until fully incorporated.

2. Roll the dough into a a large ball and let it rest in a greased bowl until double in size, about 45 minutes.

3. Meanwhile, mix all the ingredients for the filling together and set aside.

4. Divide dough into 20 portions. Roll into balls and let it rest for 10 minutes.

5. Wrap with coconut filling and seal the ends tightly. Arrange onto tray and let it proof for another 45 minutes.

6. In the meantime, combine all the ingredients for the topping and set aside. Glaze proofed buns with beaten egg, sprinkle with sesame seeds and then pipe lines on top using the topping mixture.

7. Bake at 350 degrees for about 12 minutes or till golden brown.


Jun 20, 2013

Shrimp Etouffee

The food scene in Hawaii has improved over the last few years. We have a lot of new restaurants coming up that are really exciting. Having said that though, Hawaii seems to have a problem holding on to a more unique genre of foods. A lot of my favorite restaurants close down within a year, replaced by Steak Outs (or versions of them), or maybe some Pho restaurant.

One of those restaurant is Taste of Bayou (will you ever come back?!!). I can't remember how long it has been since we went there, but I will never forget that meal. It was my first taste of Crawfish Etouffee and it was AMAAAAAAZING!! The etouffee had so many levels of flavor and everything just married together perfectly. It was spicy, but not just hot. It was just incredible. I was so bummed when they closed down, because I only got to eat there twice.

So when my sister sent me a recipe for Crawfish Etouffee from Emeril, I was so excited. I scoured all the grocery stores for crawfish, but it can't be found in Hawaii. I even went to Tamashiro Market and they didn't have them either, not even the frozen variety!! So I found a recipe for Emeril's Shrimp Etouffee. This will have to do until then. I have to say, I was not disappointed!! It was so good!!! I've made this twice now, the first time I used a mixture of clam juice and chicken broth. The second time, I actually took the time to make the shrimp stock. The conclusion is make the shrimp stock. Don't use frozen shrimp shells though, you're not going to get any flavors from that. Use fresh shrimp!!! If you live in Hawaii, Costco has amazing fresh Kauai shrimp. It's so fresh, super sweet and makes a world of difference. Enjoy!! Please leave a comment if you know of an underground crawfish distributor, I know someone must have it, they serve them at those Cajun seafood places.

Shrimp Etouffee
from Emeril

6 tablespoons unsalted butter
1/2 cup all-purpose flour
4 cups chopped onions
2 cups chopped green bell peppers
2 cups chopped celery
2 tablespoons minced garlic
1 (14.5-ounce) can diced tomatoes
2 bay leaves
2 teaspoons salt
1/2 teaspoon cayenne pepper
2 tablespoons Essence, recipe follows
1 quart (4 cups)shrimp stock, recipe follows
3 pounds medium shrimp (21 to 25 count per pound), peeled and deveined
1/4 cup chopped parsley leaves
Steamed white rice, for serving
1/2 cup thinly sliced green onion tops, for garnish

1. Melt the butter in a large Dutch oven set over medium heat. Add the flour and stir continuously to make a roux. Stir the roux over medium heat until the color of peanut butter, 5 to 7 minutes. Add the onions, bell peppers, celery, and garlic to the roux, and cook, stirring often, for 10 minutes. Add the tomatoes to the pot and season with the bay leaves, salt, cayenne, and 1 tablespoon of the Essence. Cook the tomatoes for 2 to 3 minutes and then whisk in the shrimp stock.

2. Bring the mixture to a boil, and reduce to a simmer. Cook the etouffee, stirring occasionally, for 45 minutes. Season the shrimp with the remaining tablespoon of Essence and add them to the pot, stirring to evenly distribute. Cook the shrimp for 5 to 7 minutes, or until they are cooked through. Add the chopped parsley to the pot and stir to combine.

3. Serve immediately over steamed white rice and garnish with sliced green onion tops.

Emeril's ESSENCE Creole Seasoning
from Emeril

2 1/2 tablespoons paprika
2 tablespoons salt
2 tablespoons garlic powder
1 tablespoon black pepper
1 tablespoon onion powder
1 tablespoon cayenne pepper
1 tablespoon dried oregano
1 tablespoon dried thyme

1. Combine all ingredients thoroughly.

Shrimp Stock
from Emeril

1 pound (about 1 quart) shrimp shells and heads
1 cup coarsely chopped yellow onions
1/2 cup coarsely chopped celery
1/2 cup coarsely chopped carrots
3 smashed garlic cloves
1 bay leaf
1 teaspoon black peppercorns
1 teaspoon dried thyme
2 teaspoons salt

1. Place the shrimp shells and heads in a large colander and rinse under cold running water for several minutes.

2. Combine the shrimp shells and remaining ingredients in a heavy 6-quart stockpot, add 4 quarts water, and bring to a boil over high heat. Skim to remove any foam that rises to the surface. Reduce the heat to medium-low and simmer, uncovered, for 45 minutes, skimming occasionally.

3. Remove the stock from the heat and strain through a fine-mesh sieve into a clean container; let cool completely. Refrigerate the stock for up to 3 days or freeze in airtight containers for up to 2 months.

Jun 10, 2013

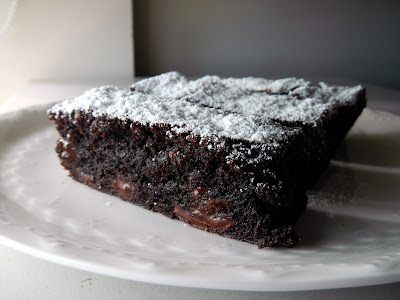
Thomas Keller Brownies

A friend of mine recently went to Ad Hoc in Napa Valley, which planted a seed in my mind about Thomas Keller. I started researching about Thomas Keller and his restaurants and came across a recipe for his brownies. Now I haven't had a chance to go to any of his restaurants yet, but if this is recipe is any indication, I will be going there soon..hopefully!!

I'm having a hard time describing this brownie to you. When it comes to brownies, I'm definitely on Team Fudge. I don't like cakey brownies because they don't seem indulgent enough for a brownie. This brownie is more cakey in texture, but it is also very indulgent!! I have never had a cakey brownie like it. It's light in texture, but oh sooo chocolately!!

Like most brownie recipes, this comes together fairly quickly...there's really no reason to use a brownie mix (no judgment!). The ingenious thing about this recipe is the part about the melted butter. The recipe says to melt half the butter, and then add the remaining pieces of the butter into the melted butter. All the butter will melt and it will be in room temperature!! Genius!! Keep that in your tricks box!

Now before I send you off to your kitchen, a little note about Dutch Processed Cocoa Powder. There are two types of cocoa powder, natural and Dutch processed. The Dutch processed type just means that it has been alkalized to remove the acidity. If you're not sure if your cocoa powder is Dutch Processed (not always labeled), just look for alkali in the ingredient list. Enjoy!

Thomas Keller Brownies
from What's Gaby Cooking

3/4 cup all-purpose flour
1 cup unsweetened alkalized cocoa powder
3/4 pound (3 sticks) unsalted butter, cut into 1-tablespoon pieces
1 teaspoon kosher salt
3 large eggs
1 3/4 cups granulated sugar
1/2 teaspoon vanilla paste
6 oz 61 to 64% chocolate, chopped into chip-sized pieces ( about 1 1/2 cups)
Powdered sugar for dusting

1. Preheat the oven to 350F. Butter and flour a 9" square pan. Set aside.

2. Sift together the flour, cocoa powder, and salt; set aside.

3. Melt half the butter in a small saucepan over medium heat, stirring occasionally. Put the remaining butter in a medium bowl. Pour the melted butter and stir to melt the butter. The butter should look creamy, with small bits of unmelted butter, and be at room temperature.

4. In a bowl of a stand mixer fitted with the paddle, mix together the eggs and sugar on medium speed for about 3 minutes, or until thick and very pale. Mix in the vanilla. On low speed, add about one-third of the dry ingredients, then add one-third of the butter, and continue alternating the remaining flour and butter. Add the chocolate and mix to combine. (The batter can be refrigerated for up to 1 week.)

5. Spread the batter evenly in the pan. Bake for 40 to 45 minutes, until a cake tester or wooden skewer poked into the center comes out with just a few moist crumbs sticking to it. If the pick comes out wet, test a second time, because you may have hit a piece of chocolate chip; then bake for a few more minutes longer if necessary. Cool in the pan until the brownie is just a bit warmer than room temperature.

6. Run a knife around the edges, and invert the brownie onto a cutting board. Cut into 12 rectangles. Dust the tops with powdered sugar just before serving.

Jun 5, 2013

Garlic Cheese Bread

Photo courtesy of Mr. O (thank you!!)
I love these Garlic Cheese Bread!! I've made these so many times, but only when I have company. The reason being is these are so good that I can't be left alone with them. I will eat the whole loaf and not even think twice!! I only make these when society rules tell me I can only have one or two slices. The thing is, these are so easy to make!!! You can make all sorts of substitutions, add other ingredients and it will still be great!

This recipe comes from the Pioneer Woman. She has a lot of mouth watering recipes, but I'm always afraid to make them because they seem to be so fatty. For example, in her original recipe, she used one whole stick of butter, 4 3/4 cups of different cheeses, and half a cup of mayonnaise. That's quite a bit of calories for just one loaf of bread!! In the adapted version below, I used a lot less cheese, and I thought it was cheesy enough! I think something that always helps is I always grate my own cheese. I think pre-grated cheese just doesn't taste as good. I also always use a strong tasting cheese, like sharp cheddar instead of medium or mild cheddar. You don't need as much cheese and you still have really good flavors.

Garlic Cheese Bread
adapted from Pioneer Woman

1 1/2 cups grated Sharp Cheddar Cheese
1 cup of grated Mozzarella Cheese
1/2 cup Grated Parmesan Cheese
1/2 cup mayonnaise
4 whole Green Onions, White And Light Green Parts Minced
1 dash Salt
1 loaf Crusty French Bread
1/2 stick Butter
4 cloves Garlic, Finely Minced

1. Mix cheeses with the mayonnaise and the green onions. Add dash of salt to taste and set aside or keep in fridge until you need it.

2. Cut loaf of bread in half, then each half into half again.

3. Divide the butter into four portions. Working 1/4 loaf at a time, melt one portion of the butter in a skillet and add 1/4 of the minced garlic. Place one of the 1/4 loaves face down in the skillet, swirling it to soak up the butter and garlic. Allow bread to toast in the skillet, removing garlic if it starts to get too brown.

4. Repeat with remaining butter, garlic, and bread.

5. Spread cheese mixture on warm loaves and bake in a 425 degree oven until cheese is hot and bubbly, about 10 minutes.

Notes:

  • Original recipe calls for 3 1/2 cups of grated cheddar cheese, 3/4 cups of Monterey Jack cheese, 1/2 cup of real mayonnaise (I tried using light mayo and olive oil mayo, and it was fine!), and 1 stick of butter.  I use whatever cheeses I have on hand, usually cheddar and mozzarella.  I've also tried using all Mozzarella, it's not as flavorful, but still very good.  
  • Add ins:  I've tried adding little bits of bacon, thinly sliced onions and also chopped artichokes.  They were all very good.  I really don't think you can go wrong with these!  
 

Template by Best Web Hosting