Mar 29, 2011

Rosie's Baklava Ice Cream Cake

Mr. G and I went to San Francisco last month and while there we went to this restaurant called Maykadeh Persian Cuisine with our friend (It was soo good!!!). I love Persian food and we just can't get it in Hawaii, so I try to get my fill in whenever I travel to the mainland. As we were looking at the dessert menu, Mr. G mentioned that it would be nice to have some baklava ice cream. Sadly, they didn't have such a thing.

When I came home, I did a search for Baklava ice cream and came up with some recipes from Desert Candy and Quinn's perfect scoop. Although both recipes look amazing, they just weren't jumping out at me. Finally, I found this recipe from Epicurious called Rosie's Baklava Ice Cream cake. Ding ding ding!! This was it...I decided to make it for a little get together we had this past weekend. It was a big hit with everyone and I have to say this was one of my best desserts!!

It's basically vanilla ice cream sandwiched between layers of yummy baklava!! What more could you want from a dessert. I was concerned the baklava would lose it's flaky crispiness in the freezer, but it was still crispy and oh sooo delicious!! You really need to make this!! I am so excited to share this with you, I can hardly contain myself. Here's the recipe.

Rosie's Baklava Ice cream Cake
from Epicurious

1 cup slivered almonds (about 4 ounces)
1 cup walnuts (about 4 ounces)
3 tablespoons sugar
1/2 teaspoon cinnamon
1/4 teaspoon freshly grated nutmeg
1/8 teaspoon ground cloves
sixteen 17- x 12-inch phyllo sheets (#4 size)
1/2 cup unsalted butter

For syrup
1/2 lemon
1 cup water
1 cup sugar
2 tablespoons honey

1/2 gallon superpremium vanilla ice cream


1. With a sharp knife finely chop almonds and walnuts separately. (Resist the temptation to use a food processor; chopping by hand is the key to the texture of baklava.) In a bowl stir together nuts, sugar, and spices. Put stack of phyllo sheets on a work surface and cover with 2 overlapping sheets of plastic wrap and then a damp kitchen towel. Melt butter and keep warm. (If butter cools, it will be too thick to brush.)

2. Preheat oven to 350°F.

3. With a pastry brush brush a 17 1/2- x 12 1/2- x 1-inch baking pan with some butter. Cover bottom of pan with a phyllo sheet, keeping remaining sheets covered with plastic wrap and towel, and lightly brush with butter. Layer 7 more phyllo sheets, brushing each sheet with butter, in same manner. Sprinkle nut mixture over buttered phyllo and with your fingers gently spread evenly.

4. On a work surface (not on top of nut layer) lightly butter and stack remaining 8 phyllo sheets, making sure top sheet is well-buttered. Transfer phyllo stack to baking pan, putting it on nut layer and pressing to help it adhere to nuts. With a fork prick top phyllo stack all over at 1/4-inch intervals going through to nut layer, to keep it from puffing unevenly. With sharp knife halve baklava crosswise and bake in middle of oven until golden brown, about 30 minutes.

5. Make syrup while baklava is baking: Halve lemon half. In a 1 1/2-quart saucepan boil water, sugar, and lemon over moderate heat, stirring until sugar is dissolved and liquid is reduced to about 1 1/3 cups, about 10 minutes. Remove pan from heat and stir in honey. Discard lemon and cool syrup to warm.

6. Pour warm syrup over hot baklava and cool in pan on a rack 15 to 30 minutes. (Baklava will absorb syrup.) Do not let baklava cool more than 30 minutes before assembling cake or phyllo layers will become too soft to transfer.

7. While baklava is cooling, soften ice cream. (We softened ours in a microwave set on defrost, 30% power, 1 1/2 to 2 minutes. Alternatively, you can leave it in the refrigerator — not on the counter —30 minutes).

8. Assemble cake: Using two 30-inch-long sheets of foil, line a 13- x 9- x 2-inch baking pan, arranging 1 sheet lengthwise and 1 sheet crosswise. With a large metal spatula carefully slide 1 baklava half into pan and top with ice cream, spreading evenly. Slide remaining baklava half over ice cream and wrap cake snugly in foil. Freeze cake at least 6 hours and up to 1 week.

9. Just before serving, cut cake into pieces.

Mar 23, 2011

Morning buns


It was Mr. G's birthday the other day, so I got up extra early to make him a treat for breakfast. He was still sleeping when these buns went in the oven and the smell of the buns actually woke him up. =)

These morning buns come from Cook's Country magazine. Lately I have been edging towards Cook's country instead of Cook's illustrated magazine. I still love CI, but each recipe takes soooo long to make and the ingredients list is impossibly long. Cook's country appeals to lazy side of me.

These turn out wonderfully. It has a flaky crust, borderline croissant dough without the fuss. The filling is a yummy cinnamon sugar with a hint of orange zest. The orange zest in the filling brings out the orange juice in the dough...it's really a wonderful touch. I made the dough the night before and the buns just need a little rise time in the oven before they're ready to bake.

An important note, though, if you do decide to make this. Use the foil liners!!! I only had 6 foil liners so the other 6 buns were in paper liners....they were really difficult to get out and got kinda greasy. Here's the recipe.

Morning buns
Cook's Country January 2011
makes 12 buns

dough
3 cups all purpose flour
1 tbsp sugar
2 1/4 tsp rapid rise or instant yeast (1 envelope)
3/4 tsp salt
24 tbsp unsalted butter (3 sticks, or 336g), cut into 1/4 inch thick slices and chilled
1 cup sour cream, chilled
1/4 cup orange juice, chilled
3 tbsp ice water
1 large egg yolk

filling
1/2 cup granulated sugar
1/2 cup packed light brown sugar
1 tbsp grated orange zest
2 tsp ground cinnamon
1 tsp vanilla extract


1. Combine flour, sugar, yeast and salt in a large zipper lock bag. Add butter to bag, seal and shake to coat. Press air out of the bag and reseal. Roll over bag several times with rolling pin, shaking bag after each roll, until butter is pressed into large flakes. Transfer the mixture to a large bowl and stir in sour cream, orange juice, water, and egg yolk until combined.

2. Turn dough onto floured surface and knead briefly to form smooth, cohesive ball. Roll dough into 20 by 12 inch rectangle. Starting at short edge, roll dough into tight cylinder. pat cylinder flat to 12 by 4 inch rectangle and transfer to parchment lined rimmed baking sheet. Cover with plastic wrap and freeze for 15 minutes.

3. Line 12 cup muffin tin with foil liners and grease liners with cooking spray. Combine granulated sugar, brown sugar, orange zest, cinnamon and vanilla in a medium bowl.

4. Remove dough from freezer and place on lightly floured surface. Roll dough into 20 by 12 inch rectangle and sprinkle evenly with filling, leaving 1/2 inch border around edges. Staring at the long edge, roll dough into tight cylinder and pinch lightly to seal seams. trim 1/2 inch dough from each end and discard (see note). Cut cylinder into 12 pieces and transfer, cut side up to prepared muffin cups. Cover loosely with plastic and refrigerate at least 4 hours or up to 24 hours.

5. Adjust oven rack to middle position and heat oven to 200 degrees. When oven reaches 200 degrees, turn it off. Remove buns from refrigerator and discard plastic. Place buns in turned-off oven until puffed and doubled in size, about 20 to 30 minutes. Remove buns from oven and heat oven to 425 degrees. Bake until buns being to rise, about 5 minutes, then reduce oven temperature to 325 degrees. Bake until deep golden brown, 40 to 50 (see note) minutes. Cool buns in tins for 5 minutes, then transfer to wire rack and discard liners. Serve warm.

Notes:
  • *I didn't trim and discard the ends of the dough.  Why waste it?  
  • *The recipe says to bake it for 40 to 50 minutes, mine were finished in about 25 to 30 minutes.  
  • *To make ahead, Cooks country says to transfer filled muffin tin to freezer until buns are firm, about 30 minutes.  Transfer buns with liners to zipper lock bag and freeze for up to 1 month.  To finish, return buns to muffin tin and refrigerate for at least 8 hours or up to 24 hours.  Proceed with step 4. 

Mar 3, 2011

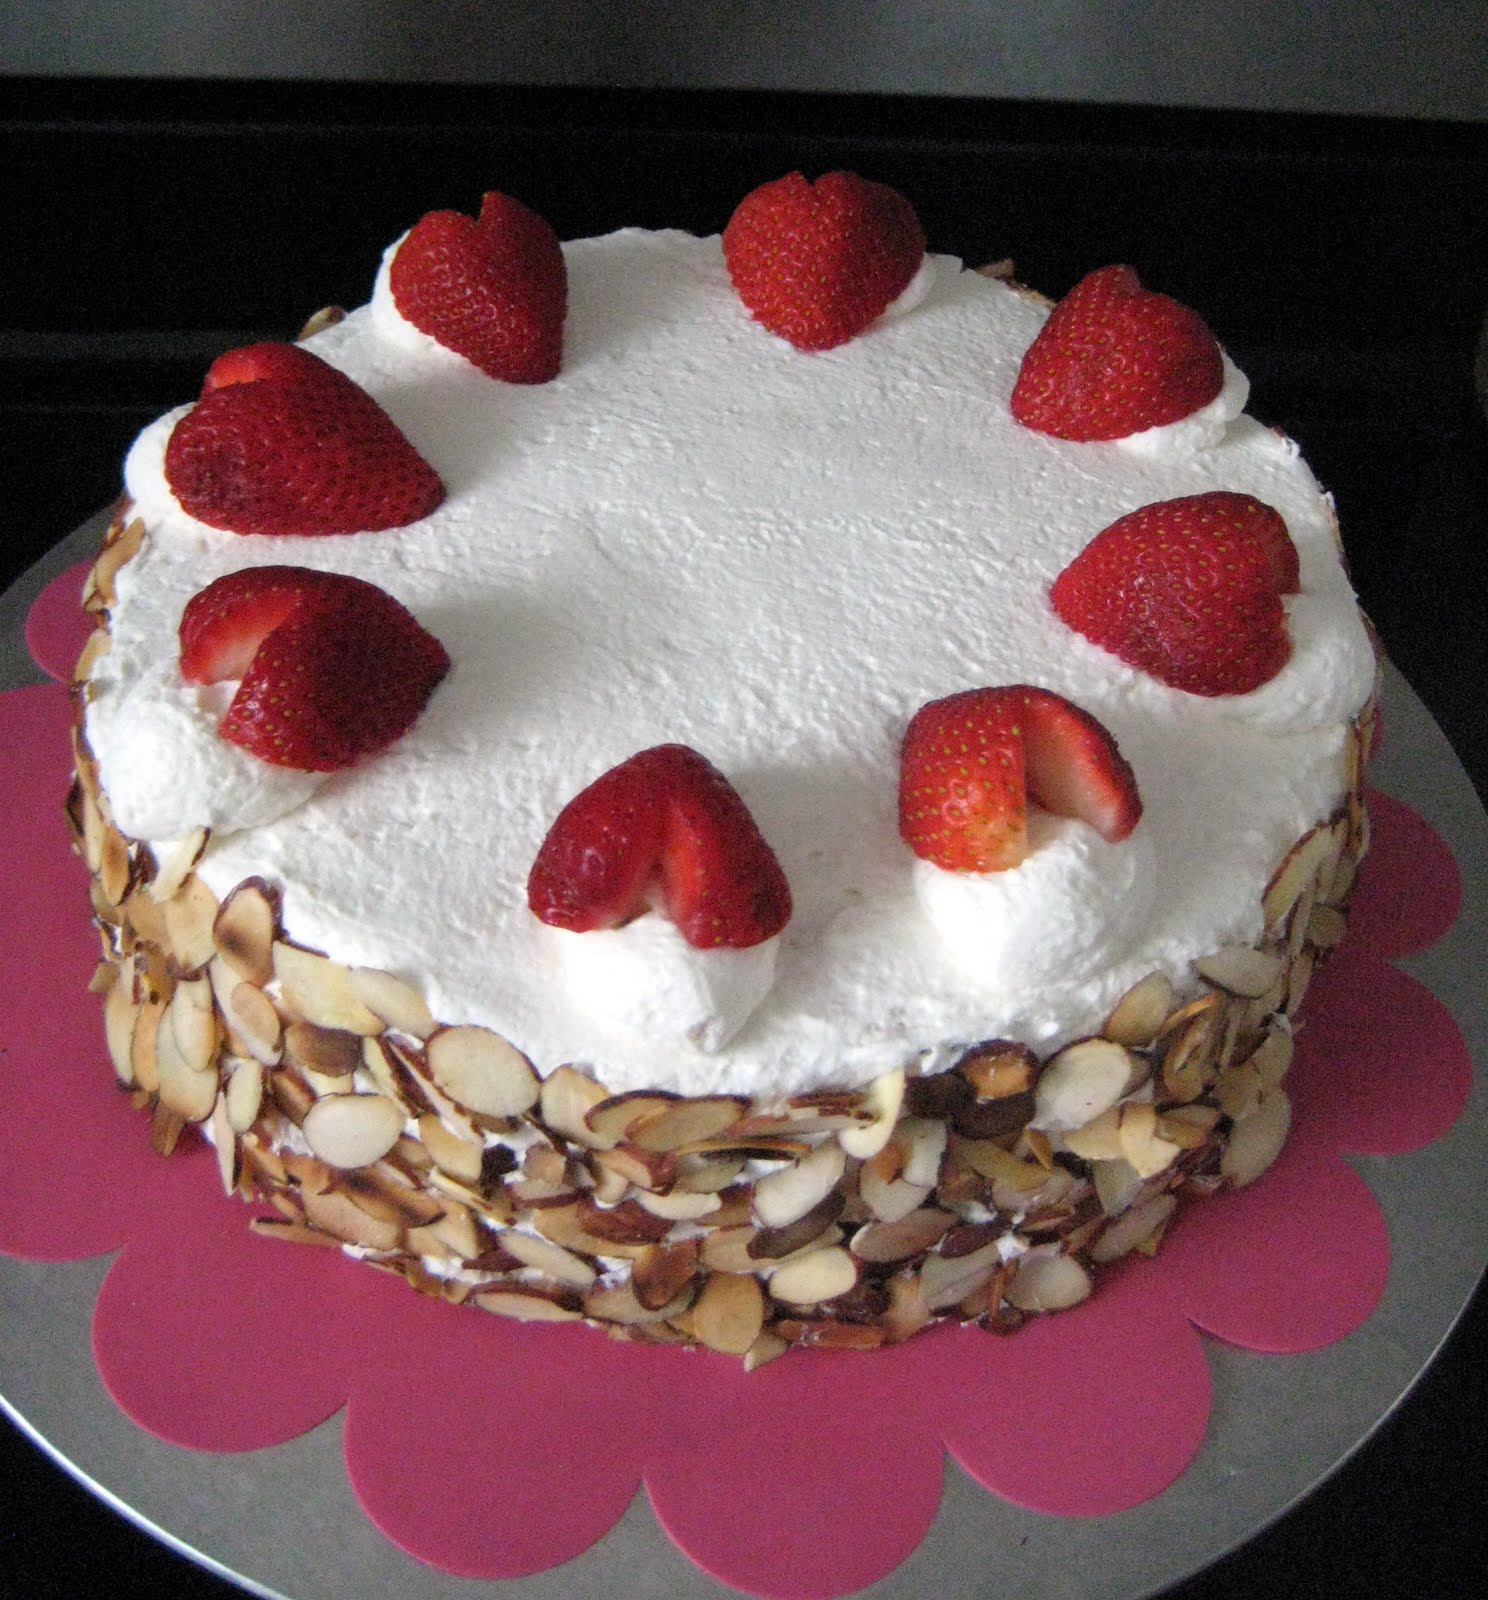
Strawberry shortcake


During the month when I went on a baking hiatus, my Kitchen-aid mixer attempted suicide. I lent my mixer to someone and when I brought it home, I rested it on a table to press the button for my elevator. My mixer fell off the table onto the floor and my heart sank. I was so shocked that I couldn't even think straight. I picked her up and as I accessed her damages I was literally holding back tears.


As you can see, she suffered damages, but I'm happy to report that she's still functioning. She often whines when she is running...which makes me worried...but so far she's been doing well. We are going through therapy now in order to work out her issues. She seems to be feeling a lot better...but maybe it's just wishful thinking.

So, my injured Kitchen-aid mixer and I made this Strawberry Shortcake together. She did a good job. The egg whites were whipped to perfection and so was the whipped cream. KAM, Please don't die on me, I wouldn't know what to do without you. Here are the recipes.

Strawberry shortcake

Honey Chiffon Cake
translated from Eupho Cafe

4 eggs
70g sugar
2 tbsp honey
2 tbsp vegetable oil
2 tbsp milk
85g. cake flour
1/4 tsp cream of tartar


1. Line an 8” pan with parchment paper

2. Separate the egg yolks and the egg whites. Beat egg yolks, 20g of sugar, and honey until it’s light yellow. Mix in vegetable oil and milk until incorporated.

3. Preheat oven to 150-degree/300 degree.

4. Sift the cake flour. Fold the cake flour into the yolk mixture until just incorporated.

5. Add cream of tartar to egg whites, and beat until soft peaks. Then add 50g of sugar in increments, until stiff peaks are formed.

6. Fold in 1/3 of the egg whites into the egg yolk mixture. Continue until all the egg whites are incorporated.

7. Pour batter into prepared pan. Hit the pan gently against the counter once to remove large bubbles. Bake for 40 to 50 minutes. Allow cake to cool in the pan upside down. When completely cool, take the cake out of the pan.

Stabilized Whipped Cream

1/2 cup cold water
2 tsp gelatin
2 cups heavy cream
2 tbsp sugar
1 tsp vanilla


1. Pour the gelatin in the cold water and allow the gelatin to sit for approximately five minutes. After the gelatin has bloomed, melt the gelatin mixture in a microwave for approximately 20 to 30 seconds.

2. Pour the heavy cream, sugar and vanilla in bowl of a mixer. Beat until the cream starts to thicken and add the gelatin mixture and beat until soft peaks form.

To assemble

1 lb strawberries
Honey chiffon cake
whipped cream
3/4 cup of slivered almonds, toasted


1. Cut strawberries into small dices. Save some strawberries for decorations, if you wish.

2. Cut cake into thirds.

2. Spread approximately 1/2 cup of whipped cream on one layer of the cake. Spread diced strawberries on the whipped cream and spread another 1/2 cup of whipped cream on top of the strawberries. Continue with the second layer.

3. Use the remaining whipped cream to frost the outside of the cake. Press almonds to the side of the cake as decoration.

Feb 22, 2011

Passion fruit (lilikoi) ice cream

As you probably can see from previous posts, I'm a huge fan of Passion fruit (Lilikoi for the Kamaainas). I love when it's passion fruit season. I tried to get a lot and just freeze the pulp so I can have it year round. I love the tartness of passion fruits and they're great for a light dessert without having always to resort to citruses. I've made this passion fruit ice cream a few times and I absolutely love it!!

This recipe comes from the great ice cream maker, David Lebovitz. Since I purchased his book, the Perfect Scoop, I have been wanting to make every recipe in the book. Some of the recipes makes me weary (i.e. Black pepper ice cream?!) , but one day I'll be daring enough to try them all. If you love ice cream, you really NEED this book! =)

I am submitting this recipe for Aspiring Bakers #4. The theme for this month is "Love" and our goodies have to be in a heart shaped. Hope you can still tell the ice cream is heart shaped....it's a hot day in Hawaii and the ice cream was melting very quickly!

Passion Fruit Ice Cream
from The Perfect Scoop

1/2 cup fresh or frozen passion fruit pulp (from 6 to 8 fresh passion fruits)
1 cup heavy cream
6 tbsp whole milk
7 tbsp sugar
pinch of salt
3 large egg yolks
a few drops of pure orange oil, or grated zest of 1 small orange (optional)
spoonful of passion fruit seeds (optional)


1. To extract the pulp from the passion fruit, cut each passion fruit in half at the equator and scoop the pulp and seeds into a nonreactive strainer set over a bowl. Use a flexible rubber spatula to press and extract as much of the precious pulp as possible, until the seeds look rather dry.

2. Mix together the passion fruit pulp and 1/2 cup of the cream in a large bowl. Set a mesh strainer over the bowl.

3. Warm the milk, sugar, salt and the remaining 1/2 cup cream in a medium saucepan. In a separate medium bowl, whisk together the egg yolks. Slowly pour the warm mixture into the egg yolks, whisking constantly, then scrape the warmed egg yolks back into the saucepan.

4. Stir the mixture constantly over the medium heat with a heatproof spatula, scraping the bottom as you stir, until the mixture thickens and coats the spatula. Pour the custard through the strainer and stir it into the passion fruit and cream mixture. Mix a few drops of orange oil, if using, then stir until cook over an ice bath.

5. Chill the mixture thoroughly in the refrigerator, then freeze it in your ice cream maker according to the manufacturer's instructions. Add a spoonful of passion fruit seeds to the custard during th least few minutes of churning, if you wish.

Feb 14, 2011

Hot Cocoa Sticks


Happy Valentine's day!!! I'm sorry I have been MIA for sooo long. So much has happened since the new years, both happy and sad and I've just been so overwhelmed that I needed a break. But, I'm back and I have for you a wonderful treat for the love ones in your life.

When I first saw these Hot Cocoa Sticks from Make and Take, I knew I wanted to make them for Valentine's Day. They are sooo cute and I was so happy to find that they make really wonderful hot chocolate. I might even go as far to say it makes the best hot cocoa I've ever had. My disclaimer is I don't drink hot cocoa very often. heehee =)

There are two parts to the Hot Cocoa Sticks...basically the chocolate fudge part and the homemade marshmallows. For the marshmallows, I also used Make and Take's recipe. Both are wonderful recipes and I can't wait to make them again!!

Here are the recipes. Hope your day is filled with love. =)

Hot Cocoa Sticks
from Make and Take

1/2 cup heavy cream
14-ounce can sweetened condensed milk (1 1/4 cups)
3 cups semisweet or bittersweet chocolate (chopped chocolate bars or chips, about 18 oz)
3/4 cup unsweetened baking chocolate (about 4 oz)
wooden sticks


1. Line an 8" x 8" pan with parchment paper or aluminum foil.

2. Heat the cream and condensed milk over low heat until steaming. Remove from the heat and add the chocolate; allow it to gently melt.

3. After about 10 minutes, return the chocolate mixture to low heat to completely melt the chocolate. Whisk vigorously until the mixture is thick and shiny. Add a few drops of flavoring oil if you like; hazelnut, coffee, or vanilla are popular flavors.

4. Pour the chocolate mixture into the pan; shake the pan gently to level. Sprinkle with cocoa, if desired. Set aside overnight to slowly set up.

5. Run a knife around the edge of the pan and turn out onto a clean cutting surface.

6. Slice into 1 1/4" cubes. Heat a knife in hot water and wipe dry before each cut, for smoothest cuts.

7. Stick a wooden stick into the center of each block.

8. Roll in cocoa or crushed peppermint candy, if desired.
 

Template by Best Web Hosting