Aug 8, 2012

Carrot Velouté-Chilled Carrot and Orange soup


One of my all time favorite restaurants in Hawaii is Chef Mavro. Since it's such a splurge to go to Chef Mavro, I try to get my dose of him through his website, twitter, and his blog!! When I found out he was doing a cooking demonstration at Macy's, I jumped at the opportunity. If nothing else, just to bask in his glory!!

He was gracious enough to share two recipes during that cooking demonstration, a recipe for Carrot Velouté, a chilled carrot and orange soup and a scallop escabeche. We also got to taste what he made and it was sooo good!!

On top of everything else, he shared some great tips for making great food. Just from listening to him, you can see how passionate he is about food. He takes such great care to making everything delicious, even the very minute details. Here are some tips I learned from Chef.
  • *When using garlic in a recipe, remove the little stem in the middle of the clove. According to Chef Mavro, that is the part that gives you garlic breath. I have been doing that since then and I notice that the garlic no longer takes over the entire dish. The dishes no longer have that harsh, pungent garlic taste.
  •  
  • *To make sure your diced onions are all the same size and in turn cook evenly, cut the onion at an angle. It's hard to explain, so I found this for you at the Kitchn.
  •  
  • *Good food takes time to cook. If you don't have time to cook, you shouldn't, just go to his restaurant! =)
  •  
  • *Use good salt when cooking! His favorite salt is the salt of Hanapepe in the Island of Kauai. Apparently you can't buy it anywhere, you just have to know someone. He goes to Kauai once in awhile to get salt for his restaurant. His second choice is La Baleine sea salt. I haven't been able to find it in Hawaii yet. He said the ones in the blue round carton is only good for salting the floor after a spill. haha =)
  •  
  • *Last but not least, life is too short to eat bad food!!
For a recent get together, I made his Carrot Velouté. I absolutely loved it. I think the ladies loved it too, but the men did not seem to care for it. I have no idea why. I thought the texture was smooth and divine, the taste was very fresh. It's a great soup for the summer!

I did make some small changes to the recipe. The recipe called for coconut foam made with coconut milk. Chef Mavro had this fancy whipped cream maker that's able to make coconut foam from just coconut milk. I only had my stand mixer and try as I may, no foam came from the milk. I used whipped cream instead. His recipe was also very simple and hid some of the steps that he did while in person. I added a bit more details so you can replicate it at home.

Here's the recipe.

Carrot Velouté
adapted from Chef Mavro

2 lbs carrots, peeled and finely sliced
1/2 of a medium sized onion, finely diced
water
1 small potato, peeled and finely sliced, reserved in water
1 sprig fresh thyme
1 sprig Italian parsley
1 dried bay leave
4 tbsp butter
2 tbsp sugar
1 cup fresh squeezed orange juice
1 cup whipping cream (see note)
1 tsp Madras curry powder
sea salt
white peppercorn, freshly ground

1. In a stock pot, saute the onions, carrots and sugar in 2 tbsp of butter. Cook until carrots and onions are slightly soft. Put enough water to barely cover the vegetables. Allow the water to come to a boil. Lower the temperature and allow it to simmer, covered, for 15 minutes.

2. Tie the thyme, parsley and bay leave together with some kitchen twine and put it in with the vegetables. Add the orange juice and potatoes into the carrot mixture and simmer for another 12 minutes.

3. Remove the herb bouquet from the soup. Blend the soup with the remaining butter in a blender until very smooth. Season with salt and pepper to taste. Chill the soup until the soup is icy cold.

4. Whip the whipping cream to soft peaks. Save half of the whipped cream for the topping. Fold the whipping cream into the soup. Serve in chilled soup bowls or plates, garnish on top with whipped cream sprinkled with curry. Enjoy!!

Notes:
  • *If you happen to have one of those fancy whipped cream maker, by all means, use coconut milk. I think it tastes better with the coconut foam. I only used regular whipped cream.
  •  
  • *The printed recipe has 1 tbsp of cumin seeds. There aren't any instructions on when to use the cumin seeds in the procedures, and I don't remember seeing him use it in the demonstration. hm....

Aug 1, 2012

Pumpkin Chocolate Chip Muffins

I made this pumpkin bread for a potluck we had at work the other day. I originally made some Old World Butter Horns from Cook's Country, but they came out so ugly (cannot post such ugly cookies, even though they are delicious!) that I had to scramble to make something else!!! This came together in no time so it was perfect!

This recipe comes from Extreme Dinner Makeover. This recipe is supposedly a copycat recipe for the Pumpkin Chocolate Chip Bread at Great Harvest. I haven't had their pumpkin bread in a long time, so I can't say for sure if it's a good copycat recipe or not. I can tell you that it's a good recipe for Pumpkin Bread.

I made them into muffins instead of the original loaf because I was pressed for time. It made about 30 muffins!!! I also decreased the amount of sugar and thought the muffins didn't suffer from it. Here's the recipe. Enjoy!!

Pumpkin Chocolate Chip Muffins
adapted from Extreme Dinner Makeover

2 1/2 cups white flour
1 cup whole wheat flour
2 cups sugar (see note)
2 teaspoons baking soda
2 teaspoons cinnamon
1 teaspoon nutmeg
1 teaspoon salt
16 oz cooked or canned pumpkin puree (not pie filling)
1 cup oil
4 eggs, beaten lightly
2/3 cup water
1 cup semi-sweet or milk chocolate chips (see note)


1. Preheat oven to 350 degrees F. Prepare three 12 count muffin tins. (see note)

2. Mix flours, sugar, baking soda, cinnamon, nutmeg, and salt together in a large bowl; set aside.

3. Mix pumpkin, oil, eggs, and 2/3 cup water together. Stir into dry ingredients. Fold in chocolate chips. Place batter in prepared pans.

4. Bake 18-23 minutes or until a toothpick inserted in the center comes out clean.

Note:
  • *Original recipe calls for 3 cups of sugar. I only used 2 cups and I thought it was sweet enough.
  • *I used Ghiradelli's semi-sweet chocolate chips, but they are a little larger than normal chocolate chips so it wasn't as evenly dispersed as I would have liked. I would suggest using smaller chocolate chips so you get a bit of chocolate in every bite!! =)
  • *I made about 30 muffins, I baked the first batch with two 12 count muffin tins. The second batch I filled six of the muffin tins with the batter
    and filled the rest with water so that they would bake evenly.

Jul 23, 2012

cake decoration


I love making cakes because I love eating cakes, but I absolutely hate decorating cakes. I can never manipulate the frosting quite well enough to create the picture that's in my head. I really should take a cake decorating class. I guess I'm not really one to care about what a cake looks like. It matters a lot more what a cake tastes like. But since most of my cakes are gifts for my friends and family, cake decoration is really something that I need to learn.

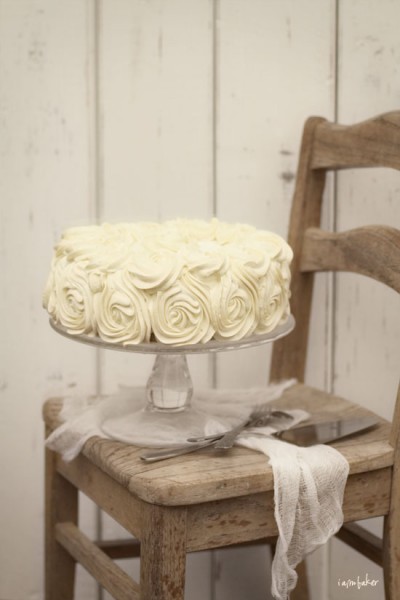
This past weekend, I threw a baby shower for my friend and two hours before the party, I was frantically searching on Pinterest for ideas on how to decorate the cake. I had originally wanted to create this rosette filled cake that I saw from I am Baker.

photo from I am Baker

Then when I actually tried to pipe those rosettes, they were all different sizes and different shapes. It was completely hideous!! I scraped it all off and tried again. This time I was inspired by this picture from Design Sponge.

photo from Design Sponge

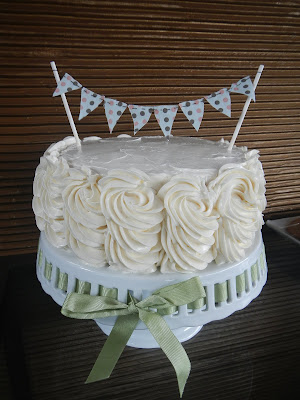
When I actually tried it, it came out pretty decent. I think I still need to work on making the loops and top prettier. It was a lot easier to do, just drawing loops with a star tip.

Now I thought the top looked so naked. So I decided on making a bunting for the top. I just love the look that it creates. That was really quite simple, you just cut little triangles and string them along. I used lollipop sticks for the ends and voila. There are no new recipes for this cake, but I just wanted to share my cake decorating dilemmas. I would love new ideas and tips on how to get the frosting to look like the ones in the stores!! Especially a whipped cream frosting. Well, practice makes perfect, I just need to keep baking!!

Jul 16, 2012

Mexican Lasagna


It's been too long!! I'm so sorry, I have been traveling and just really busy with everything that's happening. I bring this apology with an awesome recipe!!! You will forgive me after you make this Mexican Lasagna, it's so good!! I made it for some company we had the other night. I always tend to make casseroles when we have company, it's just so much easier and there's always enough food for everyone.

This Mexican Lasagna comes from Mel's Kitchen Cafe. I love her recipes and if she likes a recipe, I know I will too!! The sauce comes together really quickly and it's made with pretty much everything you have in your pantry and fridge already. The added sour cream and cream cheese adds a bit of indulgence to this lasagna. I didn't use as much cheese as the original recipe, and I didn't think the lasagna suffered. This makes a hefty lasagna so be sure to invite some friends over!! Enjoy!!

Mexican Lasagna
adapted from Mel's Kitchen Cafe

1 1/2 pounds lean ground beef or turkey
1 yellow onion, coarsely chopped
2 garlic cloves, finely minced
1 (6 ounce) can tomato paste
1 tablespoon chili powder
2 teaspoons ground cumin
dash of ground cayenne pepper
1 teaspoon dried oregano
1/2 teaspoon salt
1/2 teaspoon pepper
3 (8 ounce) cans tomato sauce
1 (14.5 ounce) can diced tomatoes, drained
1 (15 ounce) can black beans, rinsed and drained
1 1/2 cup frozen corn kernels, white or yellow
9-12 no-boil lasagna noodles (or cooked regular lasagna noodles)
2 cup shredded sharp cheddar cheese (see note)
1 cup sour cream, light or regular
8 ounces cream cheese, light or regular


1. Preheat the oven to 350 degrees. Lightly grease a 9X13-inch pan and set aside.

2. In a large 12-inch skillet, brown the ground beef or turkey and onion over medium heat until the meat is no longer pink. Drain the grease. Add the minced garlic and tomato paste. Stir to combine well and cook for about a minute. Stir in the chili powder, cumin, cayenne, oregano and salt and pepper. Mix well. Add the diced tomatoes and tomato sauce. Stir to combine. Add the black beans, and corn. Mix well and heat through, about 5 minutes.

3. Remove the skillet from the heat. Spread 1/2 cup sauce in the bottom of the prepared pan. Layer three (or four, depending on the brand of noodles you use) noodles over the sauce. Spread 1/3 of the sauce over the noodles. Dollop 1/3 of the sour cream and 1/3 of the cream cheese (just pinch off chunks and toss them on top) across the sauce. Sprinkle with 1/3 of the cheeses. Repeat the layers two more times until all the ingredients are used.

4. Cover the lasagna with foil and bake at 350 degrees for 35 minutes. Uncover and bake 10-15 minutes more, until the lasagna is hot and bubbly. Let stand 10 minutes before cutting into and serving.

Notes:
  • * Original recipe uses one six ounce can of olives.  I don't like olives, so I left it out.  
  • * Original recipe uses 2 cups of mozzarella and 1 cup of cheddar cheese.  I only used 2 cups of sharp cheddar cheese. 


May 18, 2012

Chocolate Cheesecake

I absolutely LOVE LOVE LOVE cheesecake!! It is my favorite dessert by far! For Mr. G's birthday, I made him a chocolate cheesecake with oreo crust. It was sooo good!! This recipe is sooo simple and it comes from my friend and fellow baker, Miss W. I just made a few adjustment to the recipe, but otherwise kept it in tack. Try it, it took no time to make.


Chocolate Cheesecake
from Miss W.

Oreo Crust
13 oreos
2 tbsp sugar
pinch of salt
1/4 cup of butter melted


1. Crush the oreos with a rolling pin or pulverize in a food processor until you have fine crumbs. Add sugar and salt and mix to combine. Drizzle the melted butter over the crumb mixture and mix. Press the wet crumbs into an 8" springform pan. Set aside.


Cheesecake filling:

24 oz of cream cheese, room temperature (3-8oz packages)
1 can of sweetened condensed milk (14 oz can)
12 oz semi sweet chocolate, melted
4 eggs
2 tsp vanilla extract


1. Preheat the oven to 300 degrees

2. Beat the cream cheese until the mixture softens and is creamy. Add the milk and mix until just combined. Add melted chocolate and mix until combined.

3. Add one egg at a time and mix after each addition until just combined. Add the vanilla and mix until all ingredients are incorporated.

4. Bake for 60 to 65 minutes or until the cheesecake is set. Turn off the oven and open the oven door and allow cheesecake to cool in the oven for 1 hour. Take it out of the oven and allow to cool for another hour. Refrigerate for at least six hours or overnight.
 

Template by Best Web Hosting