Jun 28, 2011

Garlic Knots


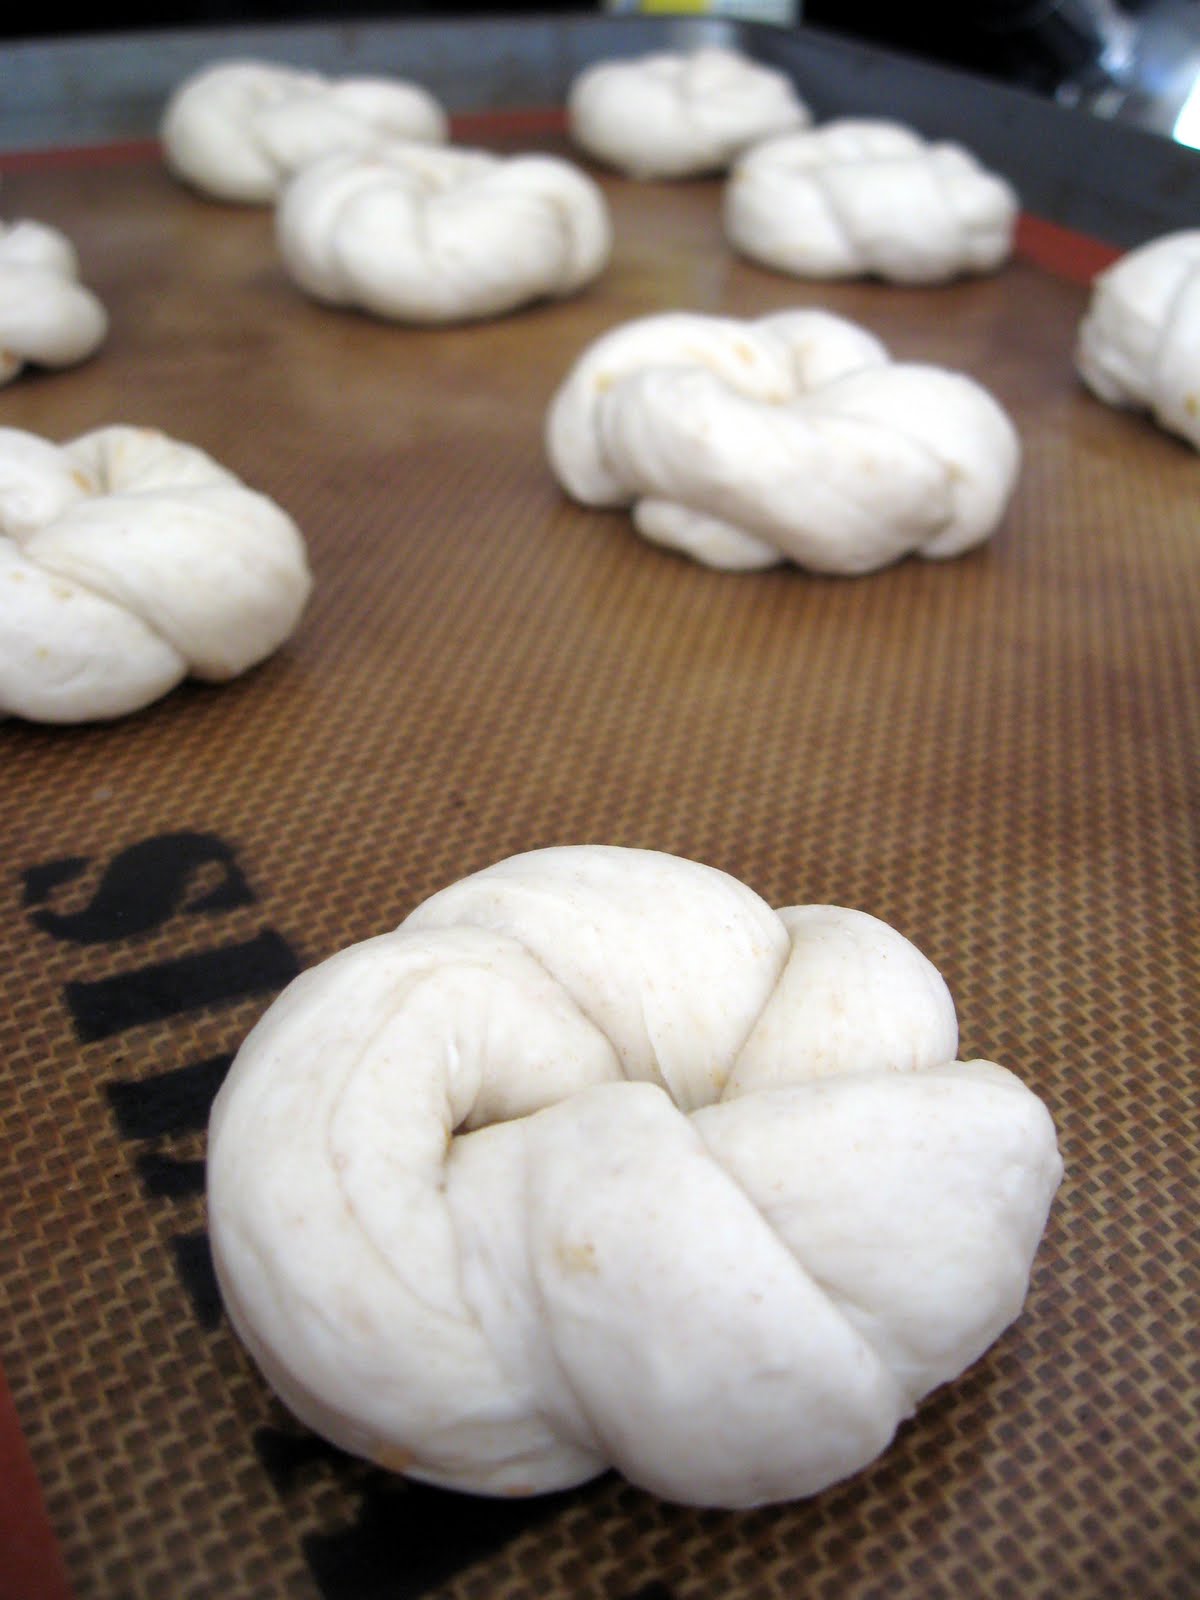
I've made these babies twice already and each time, it was for company and I didn't get a chance to take a picture before serving them to my guests. I did take a picture before they were baked this time, but they were gobbled up before the a picture was taken. I wanted to make it again and take a picture, but I couldn't wait any longer to share the recipe, so please bear with me! I will update with a new picture next time!

These garlic knots are to die for!!! The garlic bread has little bits of garlic in the dough and it's brushed with a garlic infused butter. The result is amazing!! Because these breads are cooked at such a high temperature, the outside is crispy and the inside is soft. It's a bit time consuming to make these yummy treats but it's well worth it. Here's the recipe.

Since this is such a special recipe, I'm submitting it to Aspiring Bakers. I really thought i would be able to make more than one bread this month!! This month's Aspiring Bakers is hosted by Jasmine at Sweetylicious!

Garlic Knots
from Cook's Country

10 garlic cloves, minced (2 tbsp)
6 tablespoons unsalted butter
1 teaspoon plus 3/4 cup water, heated to 110 degrees
1 1/8 teaspoons instant or rapid-rise yeast
2 cups all-purpose flour
1 teaspoon salt


1. Adjust oven rack to middle position and heat oven to 200 degrees. When oven reaches 200 degrees, turn it off. Grease large bowl.

2. Cook garlic, 1 tablespoon butter, and 1 teaspoon water in small nonstick skillet over low heat, stirring occasionally, until garlic is straw colored, 8 to 10 minutes. Add remaining butter, stirring until melted. Let stand 10 minutes off heat. Strain garlic butter through fine-mesh strainer into small bowl; reserve garlic solids.

3. Whisk remaining water, 1 tablespoon garlic butter, reserved garlic solids, and yeast in liquid measuring cup until yeast dissolves. In bowl of stand mixer fitted with dough hook, mix flour and salt until combined. With mixer on low, add water mixture in steady stream and mix until dough comes together, about 1 minute. Increase speed to medium and knead until dough is smooth and comes away from sides of bowl, about 6 minutes. Turn dough onto clean work surface and knead briefly to form smooth, cohesive ball. Transfer dough to prepared bowl and turn to coat. Cover with plastic wrap and place in turned-off oven until dough has doubled in size, 40 to 50 minutes.

4. Line baking sheet with parchment paper. Punch down dough on floured surface. Roll dough into 12- by 6-inch rectangle and cut into twelve 6-inch strips. With flat hands, roll each strip into 12-inch ropes. Following Step by Step photos at left, tie ropes into knots, tucking tails. Place on prepared baking sheet. Cover loosely with plastic wrap and return to turned-off oven until doubled in size, about 20 minutes.

5. Remove knots from oven and discard plastic. Heat oven to 500 degrees. Return knots to oven and bake until set, about 5 minutes. Remove knots from oven and brush with 2 tablespoons garlic butter. Rotate, return to oven, and bake until golden, about 4 minutes. Brush knots with remaining garlic butter and cool 5 minutes. Transfer to wire rack. Serve warm.

MAKE AHEAD Shaped knots can be refrigerated, covered, for 24 hours. Let sit at room temperature for 30 minutes. Meanwhile, heat oven to 200 degrees and turn off. Put knots in turned-off oven until doubled in size, about 20 minutes. Proceed with step 5.

Jun 25, 2011

Kaddo Bowrani (Afghani Pumpkin)


My first time to San Francisco, I went to this restaurant called Helmand. It was my first time eating Afghani food and it was very exciting. I remembered having this pumpkin dish that was so good. The textures and flavors were so beautiful and wonderful that it still brings back memories.

A few days ago, I stumbled upon a recipe for this wonderful pumpkin at Chowhound.I knew I had to try it!! I made this last night for dinner and it came out pretty well. The creaminess and slight tartness of the yogurt marries beautifully with the sweet pumpkin and spicy beef. Here's the recipe with some changes from me.

Kaddo Bowrani (Afghani Pumpkin)
adapted from Chowhound

One 2 to 2.5 pound sugar pumpkin
2 tablespoons vegetable oil
1/4 cup sugar
1/2 teaspoon ground cinnamon

1 cup plain yogurt
1 clove garlic, crushed
Salt & pepper to taste

2 tablespoons vegetable oil
2 medium onions, chopped
1 pound lean ground beef
1 clove garlic, crushed
1 cup tomato sauce
1/2 cup water
1 tbsp of garam masala
1 tsp coriander
1 tsp cumin


1. Set the oven at 350.

2. Cut the pumpkin into quarters. Remove seeds and strings, peel the skin with a vegetable peeler, and cut down into about 2-inch chunks.

3. Heat 2 tablespoons oil in a skillet or dutch oven. Brown the pumpkin pieces, turning frequently, until golden brown (about 5 minutes.) [Brown the pumpkin pretty aggressively in this step, while taking care not to scorch it.]

4. Transfer pumpkin to a roasting pan. [If using a dutch oven, leave pumpkin in the dutch oven] Mix sugar and cinnamon, and sprinkle over pumpkin. Cover with foil if using a roasting pan or cover with the lid of your dutch oven and bake for 30 minutes, or until tender. (see note)

5. While the pumpkin is baking, make the yogurt sauce and the meat sauce.

6. Yogurt sauce: mix together yogurt with one clove of crushed garlic in a bowl; season to taste with salt & pepper.

7. Meat sauce: in a skillet, heat 2 tablespoons of oil and cook the onions until lightly browned. Add ground beef, the second clove of crushed garlic, and salt & pepper. Mix well and cook until beef is browned. Add tomato sauce and water, mix thoroughly and bring to a simmer, lower heat, and cook about 20 minutes until it cooks down to a thick sauce. Add garam masala, coriander, and cumin to taste. (see note)

8. To serve: spoon yogurt sauce onto dinner plates, add a portion of the cooked pumpkin, and top with meat sauce.

Notes:
  • *Don't cut down on the sugar, it seems like a lot, but it's necessary. Make sure the pumpkin is cooked until very tender and soft.
  • *The original recipe doesn't call for the garam masala, coriander and cumin, I added it for additional flavor.

Jun 21, 2011

Raspberry and Mascaropne Mousse Cake


A late Happy Father's Day to all you wonderful dads! I have noticed recently that fathers and daughters have a very special bond. I don't care how macho the man might seem on the outside, when it comes to their daughters, they are complete marshmallows!! I see my friends and their daughters and I wonder how these little girls are able to get whatever they want from their daddies. I guess I have that bond with my dad as well. My dad would do anything for me and my sister. When we were toddlers, he used to say he would pawn everything down to his underwear to give us what we wanted. So for Father's day, I gave this very special cake to my very special dad. I would give everything I have for you too, Ba Ba.

This is my own creation inspired from many different cakes. I bought a beautiful box of raspberries, so I knew I wanted to use them. Earlier, I saw that Daily Delicious had a Banana Mascarpone Roll that looks amazing. So I took the mascarpone cream portion of that cake. In the end, I came up with a chiffon cake on the bottom, a layer of raspberries with the mascarpone cream, and a layer of raspberry mousse. Here's the recipe.

Raspberry and Mascarpone Mousse Cake

Chiffon Cake

4 eggs
80g caster sugar
60ml vegetable oil
1 tsp vanilla
3 tbsp milk
86g cake flour
2 tbsp cornstarch
1 tsp cream of tartar


1. Sift cake flour and cornstarch together.

2. Separate egg yolks and egg whites. Using a stand mixer or electric beaters. Beat the egg yolks. While beating the egg yolks, add 40g of caster sugar. Add sugar in one tbsp increments. Beat the egg yolks until it's light and fluffy and the color is a very pale yellow.

3. Once the egg yolks reach that state, mix in the oil, milk and the vanilla. Sift in the cake flour and cornstarch mixture. Gently fold in the flour mixture until just incorporated.

4. Preheat the oven to 350 degrees. Add cream of tartar to the egg whites and beat with an electric mixer or stand mixer. Once the egg whites are foamy, add the remaining 40g of sugar in 1 tbsp increments. Beat the egg whites until they reach soft peaks.

5. Gently fold 1/3 of the egg whites until just incorporated. Repeat with the remaining egg whites. Pour the cake mixture into a 8" cake pan. Hit pan gently against the counter to remove large bubbles. Bake for 25 minutes.

6. When the cake is finished baking, cool cake upside down in the pan. Once the cake is completely cooled, take the cake out of the pan and cut into thirds.

Mascarpone Cream
from Daily Delicious

150g Mascarpone cheese
150ml Whipping cream
40g Sugar
2 tbsp Milk


1. Beat the mascarpone cheese until soften, then add the sugar and milk. Mix until combine.

2. Whip the whipping cream until soft peak. Fold into the cheese mixture.

Raspberry Mousse

300g Raspberry puree
10g gelatin powder
350ml of whipping cream
3 to 4 tbsp of sugar (depends on the sweetness of your fruits)


1. Dissolve gelatin in 60ml of cold water. Allow the gelatin to sit and bloom for about 5 minutes. After 5 minutes, melt the mixture in the microwave for about 20 to 25 seconds.

2. Whip the whipping cream until stiff.

3. Combine the raspberry puree with the sugar. Add sugar to taste. Add the gelatin mixture to the raspberry mixture. Fold in the whipped cream.

Assembly
1/3 of the chiffon cake
1 recipe for Mascarpone cream
1 recipe for Raspberry mousse
Raspberries for decorations


1. Cut the chiffon cake in thirds. I only used one third of the cake and saved the rest for something else. You can cut the recipe in half and use half the cake as the base as well.

2. Place the cake round in a springform pan. Cut raspberries in half and line the edge of the cake with raspberries. Pour in the mascarpone cream to cover the raspberries.

3. Top with raspberry mousse mixture and cover with plastic wrap. Allow the cake to sit overnight in the refrigerator to firm up.

Jun 7, 2011

Peanut Butter Cup Crunch Brownies


Awhile ago, I talked about my love for Dean and Deluca's brownies. Every time I go to DC, I treat myself to this giant yummy brownie, and then attempt to walk it off by shopping in Georgetown for hours and hours. I searched high and low for recipes that would even compare to Dean and Deluca's brownies, but with no success. Today, ladies and gentleman, I think I might have found the secret to wonderful fudgy brownies.

It was a complete fluke that I came across this special technique. I made these Peanut Butter Cup Crunch Brownies and it requires a basic brownie recipe. I decided to use a brownie recipe from Alice Medrich's Cookies and Brownies. Before this, my favorite brownie recipe was her New Classic Brownies. This time I decided to try her Bittersweet Brownie recipe instead.

In this recipe, her technique says to keep stirring the batter until it loses the grainy texture and it becomes glossy and smooth. That last sentence is the key to wonderful brownies. After I made this, I vaguely recalled a brownie recipe, Robert's Absolute Best Brownies, from David Leibovitz's Ready for Dessert that said something similar. This minute of stirring is the key to the best brownie you'll ever make.

To make sure, I plan to buy some special chocolate and remake these brownies without the peanut butter portion. I will report back with the results!! I'm so excited! My search could be over! =)

As for this Peanut Butter Cup Crunch Brownie, it was really delicious! What a great combination of crunch, peanut butter cups, and yummy brownie below!! Have a piece and give the rest away, the temptation is too great!

Peanut Butter Cup Crunch Brownie
half recipe adapted from Brown Eyed Baker

Yield: 12 brownies

Bittersweet Brownies (see below for recipe)
1/4 cup salted peanuts
4 Reese’s peanut butter cups, chopped
3/4 cups milk chocolate chips
3/4 cups creamy peanut butter
1 1/2 tsp unsalted butter
3/4 cups Rice Krispies cereal


1. Prepare the brownies according to the directions and bake for about 5 minutes less than the recipe states. Remove from the oven and sprinkle the top with the peanuts and chopped peanut butter cups. Return to the oven and bake for 5 additional minutes.

2. While they are finishing baking, melt the chocolate chips, peanut butter and butter in a medium saucepan over medium-low heat. Stir in the cereal to evenly coat. Remove the brownies from the oven and evenly pour the chocolate and peanut butter mixture over top. Spread to cover evenly. Refrigerate for 2 hours before cutting and serving. Store in an airtight container in the refrigerator.

Bittersweet Brownies
from Cookies and Brownies

6 tbsp unsalted butter
3 oz unsweetened chocolate, coarsely chopped
3 oz semisweet or bittersweet chocolate, coasely chopped
1 cup sugar
1/4 tsp salt
1/2 tsp vanilla extract
2 large eggs
1/4 cup all purpose flour
2/3 cup walnut or pecan pieces (optional)


1. Preheat the oven to 325 degrees. Position a rack in the lower third of the oven. Line an 8 inch square pan with parchment or foil.

2. Melt the butter with all the chocolate in the top of a double boiler or in a medium heatproof bowl set in a pan of barely simmering water. Stir frequently until the mixture is melted and smooth.

3. Remove the top of the double boiler (or the bowl) from the heat. Stir in the sugar, salt, and vanilla. Add the eggs, one at a time, stirring until each is incorporated before adding the next.

4. Stir in the flour and beat with a wooden spoon until the batter is smooth and glossy and comes away from the sides of the pan, about 1 minute. Stir in the nuts if using. Scrape the batter into the pan.

5. Bake for 25 to 30 minutes (see note), or until the brownies just begin to pull away from the sides of the pan. Cool on a rack for at least 1 hour before removing from the pan. Slide a knife between the pan and the brownies to a cutting board. Cut into 16 squares.

Notes:
  • *The original recipe says it should take 35 to 40 minutes. I think mine were done at about 25 to 30 minutes. Check yours early, just in case, you don't want them to be overcooked.

May 31, 2011

Barbecued Turkey Sloppy Joes and burger buns


Sloppy Joes remind me of high school lunches. I was never involved in food fights, but I seem to remember sloppy joe days as being food fights day. I guess no one really cared to eat them. These Barbecued Turkey Sloppy Joes are different, I would not waste these as weapons!

Not too long ago, I discovered ground turkey. It's wonderful. I have never been a big fan of beef. I only like beef when the sauce is so strong, I can't taste the beef. Ground turkey is such a great substitution for ground beef, it's healthier, more earth friendly, and most times, you can't even tell the difference. In this recipe, the turkey is not dry at all. Mr. G had no idea it was turkey.

This recipe is from America's Test Kitchen's Spring 2011 30 minute supper magazine! I love how they come out with a magazine each season. The recipes are wonderful and so easy to make. Each magazine is jam packed with recipes and the magazines don't take up as much room in my bookshelf as the cookbooks.

Now for the buns...these are great!! I think this made the sloppy joes!! I used the hamburger buns recipe from Bread baker's apprentice. I have been reading this book like a novel and it's so interesting! There's so much to learn about the techniques of bread making and I'm more fascinated with every page. I'm sure there will be more recipes from this book to come. Until then..here are the recipes.

Barbecued Turkey Sloppy Joes
America’s test kitchen 30 minute suppers

2 tbsp vegetable oil
1 onion, chopped fine
1/2 tsp salt
1/4 tsp pepper
2 garlic cloves, minced
1/2 tsp chili powder
1 lb ground turkey
1 tsp brown sugar
1 cup tomato puree
1/2 cup barbecue sauce
1/4 cup water
1/4 tsp hot sauce
4 hamburger buns


1. Heat oil in a large skillet over medium heat until shimmering. Add onion and salt and cook until onion is soft and golden, about 5 minutes. Add garlic and chili powder and cook, stirring constantly, until fragrant, about 30 seconds. Add turkey and cook, breaking up meat with wooden spoon, until just pink, about 3 minutes.

2. Add pepper, brown sugar, tomato puree, barbecue sauce, water, and hot sauce to skillet with meat. Simmer until sauce is slightly thicker than ketchup, 8 to 10 minutes. Adjust seasoning to taste.

3. Spoon meat mixture onto buns. Serve.

Burger Buns
from Bread Baker's Apprentice

4 3/4 cups (21.5 oz) unbleached bread flour
1 1/2 tsp salt
1/4 cup (1.33 oz) powdered milk
3 1/4 tbsp (1.66 oz) sugar
2 tsp instant yeast
1 large egg, slightly beaten, room temperature
3 1/4 tbsp (1.66 oz) butter, margarine, shortening, melted or at room temperature
1 1/2 cup plus 1 tbsp to 1 3/4 cup (13 to 14 oz) water, at room temperature
1 egg, whisked with 1 tsp water until frothy, for egg wash (optional)
sesame or poppy seeds for garnish (optional)


1. Mix together the flour, salt, powdered milk, sugar and yeast in a 4-quart bowl (or in the bowl of an electric mixer). Pour in the egg, butter, and 1 1/2 cups plus 1 tablespoon water and mix with a large spoon or on low speed of electric mixer with paddle attachment until all the flour is absorbed and the dough forms a ball. If the dough seems very stiff and dry, trickle in more water until the dough is soft and supple.

2. Sprinkle flour on the counter, transfer the dough to the counter, and begin kneading or mix on medium speed with the dough hook, adding more flour if necessary to create a dough that is soft, supple and tacky, but not sticky. Continue kneading or mixing for 6 to 8 minutes. (In the electric mixer, the dough should clear the sides of the bowl but stick ever so slightly to the bottom.) The dough should pass the windowpane test and register 80 F. Lightly oil a large bowl and transfer the dough to the bowl, rolling it to coat it with oil. Cover the bowl in plastic wrap.

3. Ferment at room temperature for 1 1/2 to 2 hours, or until the dough doubles in size (the length of time will depend on the room temperature).

4. Remove the fermented dough from the bowl and divide it in half for sandwich loaves, into eighteen 2 ounce pieces for dinner rolls, or twelve 3 ounce pieces for burger or hot dog buns. Shape the pieces into boules for loaves, or tight rounds for dinner rolls or buns. Mist the dough lightly with spray oil and cover with a towel or plastic wrap and allow it to rest for 20 minutes.

5. For loaves, lightly oil two 8 1/2 by 4 1/2 inch loaf pans and place the loaves in the pans. For rolls and buns, line 2 sheet pans with parchment. rolls require no further shaping. For hamburger buns, gently press down on the rolls to form the desired shape. Transfer to sheet pans.

6. Mist the tops of the dough with spray oil and loosely cover with plastic wrap or a towel. Proof the dough at room temp for 60 to 90 minutes, or until it nearly doubles in size.

7. Preheat the oven to 350F for loaves or 400F for rolls and buns. Brush the rolls or buns with the egg wash and garnish with poppy seeds or sesame seeds. Sandwich loaves also may be washed and garnished, or score them down the center and rub a little vegetable oil into the slit.

8. Bake the rolls or buns for approx 15 minutes or until they are golden brown and register just above 180F in the center. Bake loaves for 35 to 45 minutes, rotating 180 degrees halfway through for even baking. Internal temp of loaves should be close to 190F and should sound hollow when thumped on the bottom.

9. When loaves are finished baking, remove them from pans and cool on a wire rack. Rolls should cool for 15 minutes on a rack before serving.
 

Template by Best Web Hosting